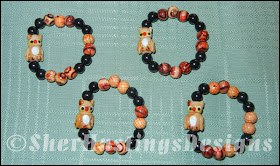
Did you know that napkin rings have been around for many years but it wasn’t until just recently that they are used as decorative items? Back before we had disposable napkins and paper towels, people used cloth napkins. Each family member had their own napkin and it would be washed on laundry day. In order to keep from getting their napkin mixed up with someone else’s, they slipped it through their own napkin ring. Many of these rings were made of silver and had the family member’s initials on them.
When I was shopping I came across these adorable owl beads and the first thing I thought of was napkin rings. I’ll be making more things out of them because I have plenty left over. I bought all they had because they were so darn cute! So if you live in Michigan City , Indiana
Here’s what you will need:
1 cute center bead for each ring
-I chose these cute owls from Hobby Lobby
Various beads of your choice
-I chose two different ones
Beading thread
-I like the 100% nylon
Needle
-I like the “Big EYE Needle” (it’s flexible)
1 big ugly bead (will explain later)
Scissors
Layout board (optional, a towel will work well)
Glue (optional)
1. The first thing I do is lay out my design on the board in the order I want my beads. I chose to have my owl in the center. My bead string measured 6”. I thought that was perfect size for the rings. I made 8 napkin rings so I counted my beads to make sure I had enough of each.
2. Cut off about 15” of thread. It’s more than you will need but it’s better than having to work with very short ends to tie off. Thread the needle and put it through the big ugly bead then tie the thread around the bead as shown leaving about 5 inches for a tail. Do not double tie because you want to be able to slip the bead off when you are finished stringing. This bead is only to keep your other beads from slipping off as you bead.
3. Starting at the bottom of your beads, begin threading your beads onto your string. Once you have all your beads on the string you can carefully remove the big ugly bead. Tie your two ends together and secure with a nice tight knot.
4. With your needle still attached, run it back through about ¾” of beads, snip close to beads. Thread the other “tail” and repeat this part going in the other direction. You may secure your know with a dab of glue if desired.
5. How simple are these? Now you can plan your menu for your next dinner and use these cute rings. Your guests will love them!


Ohmygosh, those little owls are to die for! Very cute. Thanks for sharing!
ReplyDeleteWhat a fun tutorial, thank you:)
ReplyDeleteAdorable tutorial! And I'm young enough not to know about napkin rings or why people had them... I just assumed it was purely decorative!
ReplyDeleteThanks for the informative post! :)
Erin
I love owls! These are cute. :)
ReplyDeleteI love those those owl beads!
ReplyDeletethose are so cute. I just love the little owl beads. thanks for sharing your tutorial
ReplyDeleteI love these! Thanks for the tip with the ugly bead.
ReplyDelete