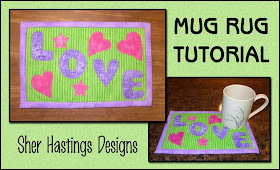
Mug rugs are so popular right now and they are my biggest sellers, so I thought I'd create a tutorial for you so that you can join me in my addiction. I know they are called "mug rugs" but a lot of people make them for decoration. They look really cute displayed on a shelf, or hung on a wall.
My personal preference is to make them using hand applique, but so many of my customers have emailed me pictures of their finished products and almost all of them are machine appliqued, so that's the technique I'm showing you here. I use a tight zigzag stitch but you can certainly use any stitch you prefer. If want to make them using hand applique, that's fine as well. When I do hand applique, I start out with my fabric bigger and cut it down after the handwork. It's easier to work with a bigger piece of fabric when you are working with a hand stitching embroidery hoop.
Before you begin you're going to need to download the pattern pieces to your computer. You can find them in a zipped file on the freebie page of my website. I've enclosed a graphic of what the finished item will look like as well as a PDF file of the pattern pieces, and a JPEG of the pattern pieces. Use whichever will be easier for you to get your pattern printed out at 100%. The PDF file should be the best solution for you. The following link will take you directly to the pattern pieces. You will find them at the top of the page.
Small scraps of fabric for appliques
1/8 yard of light weight paper backed fusible webbing
6 1/2 x 10 inch piece of fabric for background
6 1/2 x 10 inch piece of fusible fleece
7 1/2 x 11 inch piece of fabric for back
2 3/4” x 44” strip of fabric for binding
Fray-check (optional: to seal the stitches on the back)
Thread to match fabrics
General supplies:
Scissors, pins, sewing needles, paper & pencil, fabric marking pen or pencil, paper or cardstock (for printing pattern pieces), iron & ironing board, sewing machine, cutting mat with ruler & rotary cutter (optional), pressing cloth or piece of light colored, 100% cotton fabric for fusing your fleece to the top (depending on the brand you use, some fusible fleece instructions call for it).
Important tips & general instructions:
**Read tips and instructions thoroughly before beginning.
**Iron your fabrics before starting. If you will be pre-washing your fabrics, do not use a fabric softener. It can prevent your adhesive from sticking when fusing. 100% cotton fabrics work best.
**Be sure to print out your pattern at 100%. You will see a little square on the pattern, make sure it measures an inch square or your pattern pieces will not fit properly on the mug rug.
Instructions:
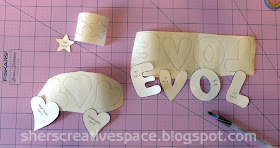
1. Print out the pattern pieces and cut them out. If you use card-stock, it will be so much easier to trace around them.
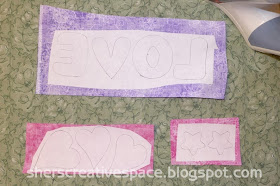
2. Turn your pattern pieces upside down so that the ink side is facing the paper-backed fusible webbing, and trace them onto the paper side of your paper-backed fusible webbing. Do a rough cut just outside the traced line. You’ll cut on the line in the next step.
3. Fuse these to the wrong side of the fabric scraps you have chosen for your applique pieces. Follow the manufacturer’s instructions for the paperbacked fusible webbing you are using. Cut your applique pieces out by cutting on your traced lines. Remove your paper backing and set aside.
4. Fuse the piece of the fusible fleece to the backside of the background fabric, following the manufacturer’s directions for the fleece you are using. Mine requires the use of a damp pressing cloth.
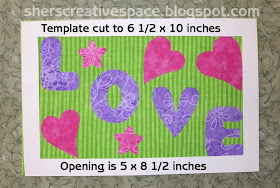
5. Flip over so that the right side of the background fabric is facing up on your ironing surface. Arrange your appliques on the fabric (glue side down) making sure to keep them at least 3/4 inch away from each edge. Your binding will take up about 3/8” of the edges. Once you are happy with the arrangement, fuse in place following the manufacturer’s instructions for your fusible webbing.
I make a lot of mug rugs so I created a template (from card stock) that helps me keep my appliques where they belong. The template measures 6 1/2 x 10 inches, and has a cut out center that left a 3/4" margin all the way around. I just place my template on top of my background and as long as my appliques are inside that cut out, I know they will be centered perfectly, and stay within that margin.
6. Machine applique around your applique pieces as desired. Use any stitch you like best. I use a tight zigzag.
Pre-binding preparation:
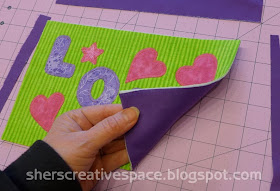
1. Place the ironed backing piece with the wrong side facing up on your work surface. Center your applique and fleece piece on top. Hand baste, pin, or spray baste to secure. I personally prefer to use the basting spray on all my small quilt projects, it's just so easy! Using a rotary cutter or scissors, cut your backing piece to the same size as the top/fleece combination. Machine baste all the way around this piece, 1/4 inch from each edge.
2. If you want to machine quilt these layers together, you can do that. I always get best results when using free motion machine quilting, but most of the time, I don’t do any quilting. This is such a small piece and fusible fleece was used for the inside.
Applying the binding:
1. Fold one of the short ends of the 2 3/4” x 44” strip of fabric 1/4” to the wrong side and iron in place. Fold the entire length of fabric in half lengthwise, with wrong sides together, and iron.
2. Beginning at the center front, along the bottom edge of the mug rug, and using the edge that you ironed in at 1/4", pin the binding to the mug rug with the raw edges of the binding even with the raw edges of the mug rug.
3. Before you do the remaining edges, you will stitch this section in place using a 3/8” seam allowance. Begin your stitching at the folded end of your binding, and stop your stitching 3/8" from the corner. I like to run a couple of back stitches at the beginning and ending of my stitching to secure seam in place. Remove project from machine and take back to your work table. Do not exceed your 3/8” seam allowance.
4. Flip your binding piece down forming a fold at a 45 degree angle. Then bring the binding back down so that the fold in your binding will be even with the raw edge at the bottom. Your raw edges of the binding will be even with the raw edges of the mug rug.
5. Secure with pins and stitch in place just as you did with the first edge stopping 3/8" from the end. Repeat these steps with remaining corners. With the remaining corners, you will also be starting your stitching 3/8” from the corner too. When you get to the end, leave an overlap of at least and inch and trim off the excess binding before stitching that final section down.
6. Trim off excess threads and remove basting stitches that might have been left behind or exposed. Flip the folded edges of the binding to the back and secure in place. Hand stitch binding to backing.
Be sure to check out the SUPER-HUGE selection of mug rugs at my Etsy Shop.
Do you like free embroidery designs and tutorials?
Be sure to sign up for the weekly newsletter to get a free design every weekend (unless I'm running a sale). Sign up for Sher's Creative News


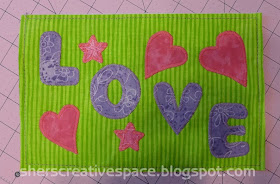


Thanks for sharing, I love how detailed your instructions are. And pink, purple and green go so well together, perfect for spring :-)
ReplyDeleteThanks for the tutorial. I'm pinning this to try later
ReplyDeleteVery cute. Bright and cheery. Perfect for Valentine's Day.
ReplyDeletepretty!
ReplyDeleteWhat a great tutorial!
Your tutorials are always so helpful for someone like me who only has basic sewing skills. I learn a lot when I come over here! :-)
ReplyDeleteMug rugs are adorable! I love this concept for using up scraps!
ReplyDeleteI hadn't heard of a mug rug before. I like it!
ReplyDeletethank you so much for the free turtorial...I have purchased many of your mug rugs and I love them
ReplyDeleteHi! Do you still have this pattern? Craftsy led me to your page but the link is not working. Thank you! Samantha
ReplyDelete