Pages

Thursday, August 28, 2014

How Many of You Remember the Old Days?


What an exciting age we live in! Back when I was a stay at home mom and I needed some inspiration or wanted to make some gifts or holiday decorations, I loaded up the kids and headed to the library. I would easily spend a whole morning there looking through books and magazines. I'd make copies of patterns and check out loads of books. I would do the same thing for recipes, nature photography, and decorating. I even went as far as bribing picking up the kids a Happy Meal on the way home since they were really good.

At the present time I've been posting quite a few tutorials on my Facebook page, as well as my Pinterst boards. Many of these, I actually plan to make. Some sooner than others. There are some brilliant and creative people out there and I thank them all for sharing these fun projects and ideas with us.

I also remember my old designing days. Back in 1993 when I had my first pattern published, I had to type it up on a typewriter, then ran to the library to make myself a copy before mailing it in a self addressed, stamped envelope. But not before I had to buy film, load it in my camera, take photos, hope they were great, and take them for developing. In the earlier days, they didn't even have 1 hour developing. Today, all my publishers accept emails and digital photos.
We are so lucky to live in an age where there are tutorials (free and to purchase) at our fingertips! Oh boy! I'm going to be busy!

Wednesday, August 27, 2014

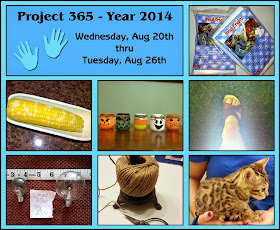
Project 365 - Week 34


Project 365 - One photo a day for a year. Kind of like a photographic journal of my entire year!

Day 232 - Look what arrived in my mail today! I've never used this before but looking forward to playing.

Day 233 - One of the best things about living in the Midwest is freshly picked produce from the local farmers. This corn was delicious!

Day 234 - Just added this candle jar tutorial on the blog! You can find it here.

Day 235 - Like my aura? Actually I went outside to photograph a tree that is turning red way too soon and all I got were foggy pictures. For fun I pointed my camera down at my foot and a fog was surrounding my leg!

Day 236 - One of the pictures I always keep on phone so that I'm sure to get the right bulbs when I need them. I use my tart burners everyday. You can read about this handy tip here.

Day 237 - Love this old fashioned twine holder! My daughter bought it for me a couple years ago as a gift. The scissors (shown at bottom of pic) slip inside the spindle on the holder for safe keeping.

Day 238 - I picked up some hours at the clinic on Tuesday. People are taking vacations so I'm helping out here and there. This kitten was there for routine surgery. What a cutie! We all had fun playing with her.

For more of my Project 365 - Click HERE

Monday, August 25, 2014

Another Way to Use Your Cellphone


I'm sharing a handy trick that I have used for years, even before I had a smartphone. Whenever I would go shopping I always want to make sure that I'm getting the right size or style of what I need. Take for example the bulbs in the photo, they are used in my two tart warmers that I have in my house. Last time I went shopping for one, there were so many to choose from that I ended up not buying one because I wasn't sure which one I needed. When I got home I placed a towel on the counter (so the bulbs wouldn't roll off), then added a tape measure and placed my bulbs next to it. I also jotted down the wattage because it was close to impossible to read from the bulbs. I had to use a magnifying glass. I then took a picture, as you can see, and I keep it stored on my cellphone. I even went one step further and added it to my Evernote files so if my phone were to die and I lost my photos, I'd still have access to that picture. You can also use your online photo albums, google drive, your cloud backup, there are hundreds of options.

Even if you don't have a smartphone, as long as your phone has a camera, you can use this little trick. If you carry a camera in your purse, you can do this too, just don't delete these pictures.

Saturday, August 23, 2014

Turotial - Baby Food Jar Candles for Halloween

 
Hand painted glassware is all the rage right now. I've come up with this super simple, quick, easy and cute craft. I'm so blessed to have a grand baby in my life so I use baby food jars. If you don't know anyone with a baby, any small jars will do. You can even purchase small, plain, votive candle cups very inexpensively at your local craft, sewing, or superstores. They make great gifts for family, friends, teachers, hostesses, or yourself as well!

Supplies:
Baby food jars, plain candle cups, or any small jar
ENAMEL paints, usually sold by the acrylic paints
~white, black, orange, yellow, green
Ribbon, twine, or raffia for the rim
Paint brushes
Palette, plastic lid, or paper plate
Alcohol
A couple (soft) paper napkins
Cookie sheet to hold jars while baking
Oven
Tea light candles or votive candles

IMPORTANT - READ FIRST:
Always start with a squeaky clean glass and keep it that way. Before you begin painting an area, be sure to wipe it down with alcohol and if you accidentally touch that area during painting, wipe that spot again with the alcohol. The oils from your hands can actually prevent your paint from permanently sticking to the glass. Sometimes it's easiest to hold the glass with your hands or fingers on the inside. At some places you may find that you want to add a second coat. It’s also very important to allow paint to completely dry between coats and color changes. Be sure to wash and dry your brushes thoroughly after each color or between coats.

Note: If you are recycling a glass food jar, if you soak the jar in hot soapy water, the label should peel right off. If you find that glue is left behind, the best thing to use is GooGone which can be purchased about anywhere. If you don't have any, or don't want to buy any, you can use a paste made up of cooking oil, baking soda, and salt. The GooGone is just so much easier and quicker.


INSTRUCTIONS:
1.  Now that your jar is squeaky clean and free from fingerprints, you can paint your first coat using the enamel paint. I find that it's best to place and hold the jar from the inside with my non painting hand. This way fingers stay off the glass. Paint first coat as follows:

Pumpkin - orange
Ghost - white
Monster - green
Candy Corn - I painted the bottom and top first, then the middle stripe after the others dried.


Hint #1 - If you want perfect lines on the candy corn jar, you can use painters tape. As you can see in the photos, I started out using it, but I found it difficult to use so I tossed it.

Hint #2 - If you aren't happy with your painting at any point in the painting process, just wash the jar and the paint will come right off, then start all over again. Once the jars are cured or baked, this will not work.

2.  After the first coat is dry you can paint the details, which are very simple if using the faces that I chose. If you want to add a second coat to the first coat you can do that, but I chose not to because I like to see more of the candle glow.
 

If you don't like my faces, search the Internet and find some you like. The ones I chose are so simple and I'm not the best painter, so I like simple details. It's just very important to let the coats completely dry before painting too close or on other colors.

3.  Once the glasses are completely dry, you will have to follow the manufacturer’s instructions for on the bottle of the paint brand you are using for finishing. For example, for the brand of paint I used, I was to allow my paint to dry for 48 hours. After that, I set them in a cool oven, I set the temperature to 325 degrees, bake 30 minutes, turn oven off, let them cool down in the oven before removing.

 
4.  After they have cooled off, you can add your ribbon, raffia, or twine to the rim. Pop in a candle and enjoy!

After they are baked, they can be washed. The bottle of paint I used said they are top shelf dishwasher safe, but I would still wash by hand.

Do you like free embroidery designs and tutorials?

Be sure to sign up for the weekly newsletter to get a free design every weekend (unless I'm running a sale). Sign up for Sher's Creative News

Tuesday, August 19, 2014

Project 365 - Week 33


Project 365 - One photo a day for a year. Kind of like a photographic journal of my entire year!

Day 225 - Babysat baby Paige. She has so much fun with her dog! They just adore each other.

Day 226 - Found these in one of my storage boxes. Notice the prices! One had a copyright date of 1966 on the back.

Day 227 - It has been a bad year for flies. They are bad everywhere. Glad these are on the outside!

Day 228 - Doing a little Halloween and Christmas in the studio this week.

Day 229 - Working on a tutorial which will be ready soon.

Day 230 - Baby Paige's mommy took this picture. She's now ten months old!

Day 231 - Christmas time at Hobby Lobby.

For more of my Project 365 - Click HERE

Sunday, August 17, 2014

Magazine Subscriptions that will Trick You


I have to tell you, these magazine companies are getting so greedy the past several years. When they send you a subscription notice, you really need to investigate. At our house, we get a lot of magazine subscriptions. We get everything from cooking, to woodworking, to crafts, and general reading material. Above is one example. I've blocked out the name because we really like the magazine, and it really doesn't matter, because many of them are doing it.

Notice where it says "Subject to Expiration." At first glance it makes you think that is when your magazine expires. But no, it's when this special deal expires. About an inch below in much smaller print, you'll find the code to the actual expiration date of the magazine subscription. Just think if it were one that didn't post the expiration date. And what is with the free gift subscription? It confused me right off the bat! So tricky in so many ways, especially when people today are so busy and constantly multitasking, they don't always read every line. And doesn't "Customer Notice" make it sound like something you need to know? We have some magazines that send us renewal notices several times a year.

Another trick some of the use is they don't put the expiration date on your issue. This can be confusing. I'm on to them now! I keep a file in my Evernote notebooks (you can use a spreadsheet, word document, or anything you like) so I can keep track of all my payments that I make to renew. I note if it's a digital issue or a paper issue, the payment method, the date I paid it, how many issues, and the new expiration date. When you get as many as we do, that's the only way to keep track.

Thursday, August 14, 2014

Project 365 - Week 32


Project 365 - One photo a day for a year. Kind of like a photographic journal of my entire year!

Day 218 - Saw these beautiful flowers in a neighbor's yard. The white flowers are about six inches across, maybe bigger. I have no idea what they are called because I'm a horrible gardener.

Day 219 - I saw this guy on our walk today. We have so many deer where we live. 

Day 220 - Stopped by the hospital for routine blood work. I was starving because I had to fast.

Day 221 - Bought some more reusable grocery bags so I can help make a little dent in helping the environment. Going to pick up some more today while I'm out.

Day 222 - I'm sure that all my blogging buddies recognize this precious face by now. Yes, it's baby Paige! Can you believe she's going to be a year old in two months?

Day 223 - The carpets got cleaned today and the dining room chairs were on the table so of course Punkie had to investigate!

Day 224 - A new project in the works! This one will be a gift.

For more of my Project 365 - Click HERE

Monday, August 11, 2014

Recycling - Doing My Part


I was listening to my favorite talk radio station (WGN-Chicago) several days back and they were talking about plastic grocery bags. They are trying to pass something (or maybe they already did) so that within the next couple of years, they will be done away with. I thought it sounded like a great idea! They do so much more harm to the environment, as well as the wildlife than people can even imagine.

So, I've decided that every grocery shopping trip I'm going to pick up a few reusable ones and use those from now on. If I would have known that they were only 50 cents, I would have bought more last time. I also have a bunch of fabric tote bags I can use. I'm planning on keeping several in all my vehicles, and in the house.

Gotta run, heading to the doctor, then running errands. Gotta grab my bags!

Tuesday, August 5, 2014

Project 365 - Week 31


Project 365 - One photo a day for a year. Kind of like a photographic journal of my entire year!

Day 211 - Putting the finished touches on the Halloween and Christmas jar cozies which are finally finished and listed at my Craftsy and Etsy shops.

Day 212 - The eve before August. Can you believe it's already here?

Day 213 - Worked at the animal hospital today. Got this picture of Doc's youngest rhea. These silly birds think they own the place!

Day 214 - Baby Paige spent the night at Nana's! She was such a good girl and slept all night long. She was all smiles and standing up in her crib when she woke up in the morning. She just lights up my life!!!

Day 215 - Baby Paige was trying to grab Grandpa's hand but it was under the glass. She was fascinated by this!

Day 216 - Elyse bought me this teddy bear several years ago. I think he's waiting for Baby Paige to grow up a little so she can snuggle him.

Day 217 - Just finished these cellphone cases and tablet sleeves. They are going to be a tutorial on my blog. It's almost ready, and should be up by the end of the week.

For more of my Project 365 - Click HERE

Friday, August 1, 2014

Introducing - Jar Cozies!


We are so excited to be introducing a new pattern line at Sher's Creative Space! We have several more in the works but we'll start you off with Halloween and Christmas. These little cozies make the best gifts! You can fill them with anything from candies and cookies, to candles, teas, or soaps. You can even wrap them around a jar candle, or cover an empty soup can and use it as a pencil container. They will also look cute on your counter holding your cooking utensils.

Each pattern has instructions that show you exactly how to customize the cozy to fit your jars, so easy. You'll be using fusible fleece interfacing so they will be speedy quick to make, and they are finished off with a simple binding. You also get all four applique templates for each pattern. Each applique template comes in two sizes (3 & 5 inches high) so that you can choose the size that fits your needs. You can even use the applique templates for other fun things as well like mug rugs, gift bags, and aprons.


The Christmas and Halloween patterns are now available for download at my Craftsy shop and my Etsy shop.

I also have a tutorial for a much simpler one right here on my blog.