

One of the questions I get asked a lot is if my mug rug patterns can be made smaller or bigger for place mats and other things. Just because I put these appliques on a mug rug doesn’t mean that you have to make a mug rug. For me, they are the perfect size to use for decoration either on a wall, bookshelf, or in a china hutch. Since most people use them for decoration, maybe they’d like a bigger display for their wall or for a quilt. In any case, it’s very easy to adjust the size of the appliques.
First and foremost, I always recommend using the Adobe Acrobat Reader to view and print all your patterns. It’s extremely reliable, easy to use, and you can download it free from the adobe website. I have used other PDF readers and some won’t allow you to adjust the sizes of your printout.
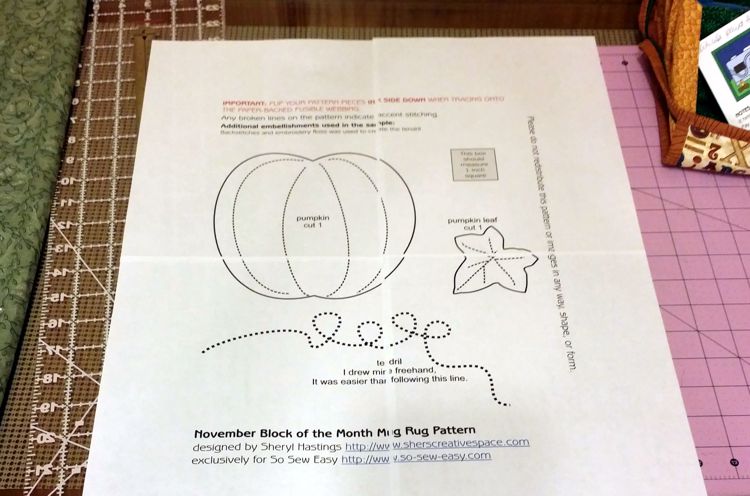
I’m going to first show you how to make your patterns smaller. For demonstration purposes, I’m only going to be cutting out the pumpkin and not the other vegetables, leaves, or acorns.


Let’s say I want to put the pumpkin on a child’s pocket which only measures 4 inches by 4 inches. I’m going to reduce the size of all four pieces so it will fit. I’m going to measure my entire piece across, and top to bottom. First though, for just this one pumpkin, I see no need to use the entire tendril, so I’m going to cut it so my pumpkin will be centered nicely. This gives me a measurement of 5 inches across, and 5 1/4 from top to bottom. I’ve decided I want my pumpkin to measure 2 3/4 inches tall. I am using the measurement of the height because it’s the bigger number. This will assure that my pumpkin fits both ways.
To get the pumpkin the size I want, we use basic math. We are going to divide 2 3/4 by 5 1/4. Remember, to make the pattern smaller, we divide the big number into the smaller number. To make it bigger, it’s the opposite. When I do the math (2.75 ÷ 5.25), I get .52. This means that I’m going to reduce my pattern to 52% of its original size.
Now go to your print box (of your Adobe Acrobat Reader) and choose print. Under “Page Sizing and Handling” you will see options. Check the one that says Custom Scale. Type in 52, then Print. You are printing this out at 52% of its original size. That’s it! Easy peasy!


When you adjust a pattern to be smaller, sometimes there are pieces that will be so super tiny, it will be impossible to applique around them. For these instances I use a straight machine stitch, and if it’s still too small, use your imagination and bring out your fabric paint, 3-dimensional paints, buttons, and beads.
Enlarging the pattern is a little trickier because if you adjust the size of the pattern to be larger, your pattern pieces will more than likely go off the page. Don’t worry because if you are using the Adobe Acrobat Reader, you can have everything print out the way you want it the first time!
So, we already know that the pumpkin measures 5 1/4 inches tall. I’ve decided to put this one on a 10 inch quilt block, and again, I don’t want the entire tendril. So I’ve decided to make my pumpkin 8 inches high. Math time again! 8 divided by 5.25 equals 1.52. This will translate to 152%. If I put this number into my Custom Size box then print, it’s going to cut a good part of my design off, so there is a little different way to do this when enlarging.
This time, when you bring up your print window, Actual Size should be the default. Look above that setting and you will see four clickable boxes. Choose the one that says Poster. Type in your 152% where it says Tile Scale. Just to show you what is going to happen, click the box that says Size, then go back to Poster. Now you will see (in the preview pane) that your new printout will take up four pages. Choose Print. You now have four sheets of paper, and now all you have to do is tape your pages together and cut out your applique templates!

I hope this article not only helps you with sizing your appliques, but also inspires you to take all those mug rug and applique patterns and put them on all kinds of fun things like aprons, pillows, tablet sleeves, jar cozies, etc. The possibilities are endless!


Great idea! These make for adorable home decor.
ReplyDeleteI am terrible with math, but your tutorial is so clear and simple! I've always wanted to know how to make patterns larger or smaller but my non-math brain just couldn't figure it out! Thank you SO much for this awesome tutorial.
ReplyDeleteThank you for explaining this. It will save a lot of time, money, and paper. I use to go to the copy shop and play around with resizing to get what I wanted. I am very glad to know how to print out something larger than 8 x 11 inches.
ReplyDeleteWhat a wonderful and easy read for adjustments. Just love it and thank you so much for taking the time to tell us.
ReplyDeletethank you very helpful information.
ReplyDelete