Wednesday, September 20, 2023

How Do You Organize Your Time?


After trying so many different ways and things to organize my time and my life, I've finally figured out what works for me. If you search for tools or information for time organization, you'll find hundreds of apps, spreadsheets, digital planners, paper planners, list makers and more. It can be overwhelming! And I think I've probably tried them all at one point or another in the past several years.

When looking for a time management or notes tool, at least for me, it had to fit the following criteria:

Must be fast

Must be easy

Must sync seamlessly between my tablet, computer, and phone

Must be capable of handling a lot of information but yet be simple

I'm going to share with you what I have finally found that works for me. Believe me when I say that I have tried almost everything out there. My system may not work for you, but if you are still on the lookout for a great way to organize your time, give these a try. And the best part.....they are FREE!

First, Google Calendar with Keep Notes. If you have an Android device, you probably already have the Google calendar and Keep Notes. If not, you can download it from your apps store. These work well together in fact, you can open your Google Keep Notes right there in your calendar app while on the computer. There are so many ways to keep your calendar organized with events and tasks. You can also share your calendar with your work group or family, or you can just share a part of it. Seriously, it does so much! I like to keep my Keep Notes up with my calendar because that is where I keep my weekly checklist, grocery list, and a couple other items that I use on a daily basis. It's all right there and ready for me when I need them. And of course, I can access them from all my devices. I also have my Google Assistant (awesome app) set up so that when I ask it to take a note, it stores it in my Google Keep so I will see it right away when I get back to my tablet or computer. I also like that I can view my calendar in different modes such as monthly, weekly, daily, and agenda. On my phone and tablet, I like to use agenda (or schedule), and on my computer I like to look at the whole month.

For other notes such as long lists, project planning, recipes, etc, I use Samsung Notes. It's only available for Samsung tablets, computers, and phones but it's a powerful little app. I love that I can import PDF documents and annotate. This is especially handy when I'm proofreading my patterns. It allows you to organize in folders and even folders in folders. I call it my second brain. You can't use it in your computer, but if you download the "Link Phone to Windows" app, you can use it by connecting through your phone with Windows 10 or 11.

Now you see how I organize my life; how do you organize yours?


Do you like free embroidery designs and tutorials?

Be sure to sign up for the weekly newsletter to get a free design every weekend (unless I'm running a sale). Sign up for Sher's Creative News


Monday, September 18, 2023

New Video Posted - Cellphone Bag for 5x7 Inch Hoop

A new video has been posted at the YouTube channel! Step by step instructions to make the cellphone holder with your 5x7 inch hoop. You can check it out HERE.

If you are looking for the bag design, you can find it HERE.

Do you like free embroidery designs and tutorials?

Be sure to sign up for the weekly newsletter to get a free design every weekend (unless I'm running a sale). Sign up for Sher's Creative News

Tuesday, August 22, 2023

Tour of My Sewing and Embroidery Studio


Several years back I gave a tour of my studio but a lot has changed in the studio and with my designing since then. The one thing that hasn't changed is that it is and always will be my happy place.


I gave my husband measurements and he built me two complete walls of shelving according to my specs. The big piece in the bottom picture is a Murphy bed. It's so easy to pull down when we have guests. When our granddaughter spends the night her and I like to have movie night in our jammies. We have popcorn, candies, herbal tea, and of course Berta (Yokie in top picture) likes to join us. Above my desk on the wall to the left is a TV that we can pull out from the wall and turn it toward us.

I also have a foldup standing desk (stored under the desk to the left) that I can put on the table in the bottom picture, or my desk when I feel like I'm getting too much sitting time.


I just recently added the table on the left so I could have my sewing machine up and my embroidery machine at the same time. I actually quit sewing a few years back because it was a pain to clear off my desk to place the sewing machine. Now it's always ready for some serious stitching.


Of course I have lots of great storage! Ribbon fit perfectly in the over the door shoe holder and an over the door handbag holder is perfect for my interfacings, stabilizer, and some of my vinyl.


I love the cabinet at the right. I bought it about 35 years ago. It fits my cotton fabrics perfectly! And that gaming chair is so comfortable!


There is always some kind of work in progress. If I have to pull down the bed for a guest, I just fold up the table and stash it behind the door and place the stuff on top in a bin that goes in the closet. Takes about five minutes.


I love my desk! It's the perfect set up for me. The monitor at the left is so handy for those times when two monitors are needed. Plus, it's so large I can really see what I'm doing. You'll also notice that I have my Samsung tablet ready to go when I need it. I also always have a pen and paper for notes. And of course, you can see at my feet there is a little bed. That's because Berta never leaves my side.


Above really is the view outside my window. Momma deer seems to trust us because this isn't the only time she's left her babies in our yard for the day. On this particular day, I had to take my dog out in the front yard on a leash so he wouldn't disturb them.

I hope you enjoyed the tour. Now you have a peek inside the studio where all my creations come to life!


Do you like free embroidery designs and tutorials?

Be sure to sign up for the weekly newsletter to get a free design every weekend (unless I'm running a sale). Sign up for Sher's Creative News


Wednesday, August 16, 2023

Old Cemeteries

I hope I don't lose my people on this one, but I have a whole other side to me. I'm still crafty, family-oriented, and love my baking and cooking, but I also love to visit old cemeteries. The older, the better. I have a partner in crime on these missions so I'm not alone in these adventures. I didn't have any interest in them until I moved out to the country. Up the hill, tucked in the woods right behind my house is an old family cemetery. One day I decided to take a look. I was fascinated by the old headstones, some of which the wording have completely faded away. I was curious so I researched the family and found some interesting reading. There are three headstones that have military markers. Two are from the War of 1812, and one from the Civil War. For such an old cemetery, I was surprised and happy to see that someone has been taking very good care of the property. They just recently put up new fencing, a new sign, and mulch on the hill leading up to it. I hope to talk to that person if I ever see them.

Another thing about cemeteries is that it's a great place to get your steps in! Not the one on the hill, but the bigger ones. We have so many trails near our house yet the big cemetery in town is always full of walkers. One of my favorite things to do is look at all the military graves. I just started carrying pennies with me so I can place them. If you like to leave coins on the headstones, here is an article on how to do it, what it means, and how it all began.

https://dma.mt.gov/MVAD/MVAD-Images/Coins-on-headstones-meaning.pdf 


Do you like free embroidery designs and tutorials?

Be sure to sign up for the weekly newsletter to get a free design every weekend (unless I'm running a sale). Sign up for Sher's Creative News

Wednesday, July 26, 2023

Turn a Blog Tutorial into a PDF Document You Can Save


Did you know that it's so easy to turn blog tutorials into PDF documents you can save to your computer to view offline? And it only involves a couple quick steps. Gotta love technology!


If you are looking for a particular post such as a recipe, list, or tutorial, you can either click on the tab to that section or do a search on the blog. If you are already on the page you want, perfect!


Make sure that the post you want to convert is the only post selected otherwise you will be saving a lot of posts at once. For example, on my blog, you just click on the title and you'll get just that blog post.


Now that you have chosen your post, just do a Control + P and it will bring up your print window. Normally your printer will be selected in the Destination box, click the little down triangle and choose Save as PDF. If you want to save the entire post, just click Save. Some posts have a lot of comments and other things following the post so you can choose only the pages you want. You'll find that right below the Destination. It will say Pages

Once you've chosen the pages you want, choose Save and then you'll need to save it to a folder on your computer, or you can just save it to your desktop. Make sure you give it a name that you will find when looking for it and that's it! Now your recipe, notes list, tutorial, ideas list, etc... will be at your fingertips when you need it!

TIP: Create a folder on your tablet or computer for ideas and such. Create sub-folders and you can catalog all your ideas in one place for easy access. You can create the sub-folders for such subjects like recipes, petcare, baby tips, etc.

This is especially handy for saving the craft or sewing tutorials because you can load them onto your tablet for easy viewing when you're ready to create the project!


Do you like free embroidery designs and tutorials?

Be sure to sign up for the weekly newsletter to get a free design every weekend (unless I'm running a sale). Sign up for Sher's Creative News

Saturday, July 15, 2023

Crossing the Canadian Border 2023

After a three month wait for our passports to arrive, my husband and I hit the road for a trip through eastern Canada. We covered locations which are completely different from each other. I'll share some of those experiences later.

There are some major differences between the US and Canada. Some took me by surprise while others made me question why the US doesn't enact them.

The biggest thing I noticed while traveling is how green Canada is. Wherever you see a trash can, you usually see recycling bins next to them. Every hotel we stayed at also had recycling bins next to our trash bins. Another thing I noticed was that there was not a single plastic straw to be found. All the straws we got for our drinks were paper or some other type of biodegradable material. They weren't the icky paper straws from years back that stuck to your lips, they were quite comfortable to drink from. I don't know if the straws in alcoholic beverages are the same because my husband and I gave up alcohol about a year ago, so we didn't use or see those.

Being a serious tea drinker (thanks to Mom’s English blood), I am very picky about my teas. I even carry a couple tea bags in my purse because I refuse to drink the generic icky stuff. Any hot tea I ordered either gave me a selection of teas to choose from or had a good quality brand with my hot water. As for the iced tea, many of the places we ate at only offered sweetened tea. I'm not a fan of sweetened tea so I just stuck to water for those places.

All the areas we traveled through (Eastern Canada) there was a lot of French. Just across the border in Toronto they had signs that had both English and French. It was the same for their TV stations. By the time we got to Quebec, it was all French! Fortunately, the people who live there spoke English and French, so we didn't have any problems getting around. However, all the road signs, menus, TV stations, etc, were all in French. The locals were very helpful though. I will also add that the kilometers were driving my husband nuts when he was driving. He wanted to go 100 mph and I told him that the sign said 100 km per hour, which is about 63 miles per hour. At least in the areas we were at, the speed limit was never over that amount.

That's the general breakdown of the entire trip. I hope you'll stick around for the next four posts where I'll get into the basics about the four general areas where we stayed.


Do you like free embroidery designs and tutorials?

Be sure to sign up for the weekly newsletter to get a free design every weekend (unless I'm running a sale). Sign up for Sher's Creative News


Wednesday, June 21, 2023

Blog Tutorial - Tablet Sleeve with Pocket


When I travel I like to take my tablet with me, or if I know I'll be waiting for an appointment I'll grab it as well. This way I can get some work done. Sometimes I take my little keyboard, and sometimes I don't. But I always seem to have papers, so it was important for me to include a pocket that will not only hold these items, but is also secure. I came up with this one and it works perfectly! I'm going to show you how simple it is to make yours, custom to your tablet or device. It's a perfect fit and not too snug.


Supplies

100% cotton fabric for outside, pocket, and flap

100% cotton fabric for sleeve lining and pocket lining

Fusible fleece interfacing

Medium weight fusible interfacing

Amounts for the above supplies will depend on how large your tablet or device is. My dimensions are for the Samsung Galaxy Tab 6 Lite


KamSnaps were used for my tablet, but you can use any type of closure you want

Thread to match fabric

General sewing supplies will also be needed such as pins, needles, cutting tools, marking pens, sewing machine, and iron.


Preparations

Measure the width of your device, plus the depth. Mine measured 7 1/8 inches, so I rounded it up to 7 1/4inches. Next, measure the length plus the depth. Mine measured 10 1/4 inches. If you want your case/sleeve to fit perfectly, it's important to take accurate measurements and keep your seam allowances as directed in the instructions.

  
If you keep your device in a protective case, be sure to have it on when taking your measurements. You can use this sleeve without the protective case if you choose, but I personally like the protective case on mine even when it’s inside the fabric sleeve. The case makes it easy for me to use it at a slant on a table if I need to.

Using the measurements that you took of your device, you are going to add 1 1/2 inches to the width, and 1 1/4 inches to the length. 

Since my tablet measured 7 1/4 x 10 1/4, my fabric cuts for the outer sleeve and lining will be 8 3/4 x 11 1/2 inches. This additional amount will be for the seams and the excess bulk.


Cut the fabric as follows

From the new measurements above, cut out 2 outside pieces, 2 lining pieces, and 2 pieces of fusible fleece interfacing. These will all be the same size. For my Samsung tablet, they will all measure 8 3/4 x 11 1/2 inches. Use the measurements you took for your device.

For the pocket, you will cut a piece of outer fabric, and medium weight fusible interfacing the same width that you cut for your sleeve, but an inch shorter for the length. For the pocket lining, you will cut it the same size as your outer sleeve pieces from your lining fabric.

Once you have decided how large you want your flap, you will cut that size from outer fabric (two pieces) and fusible interfacing. Be sure to take into account the 1/2 inch seam allowance all the way around. I wanted to make sure that mine was long enough to close over the pocket to keep papers or other items from slipping out.

NOTE If you only have lightweight fusible interfacing, you can double up on it. That was my case so that’s what I did.

Assembling your sleeve

Fuse the fusible fleece to the backside of each outer tablet piece. Fuse the medium weight fusible interfacing to the backside of the flap, and the other piece to the backside of the outer pocket fabric.

Be sure to follow manufacturer's instructions for the fusible products you are using.

Place the outer pocket piece and the lining pocket pieces right side together. Your lining fabric will be an inch longer. That’s the way it’s supposed to be. Run a row of stitching along the upper edge of your pocket, stitching the two pieces together 1/2 inch from the raw edge.

Place these pieces on the ironing board with the lining side facing you. Pull the lining up and iron the seam just like that. Then flip the lining over to the backside of the pocket and iron in place. This will create a mock binding. Pin to secure. Stitch along the “binding” close to the edge near the seam. Stitch a row of basting stitches down each side about 3/8 inches away from the edges. You will have a little excess at the bottom of the pocket where the lining and the outer pocket doesn’t meet up evenly. Just cut the excess away so they are the same length.

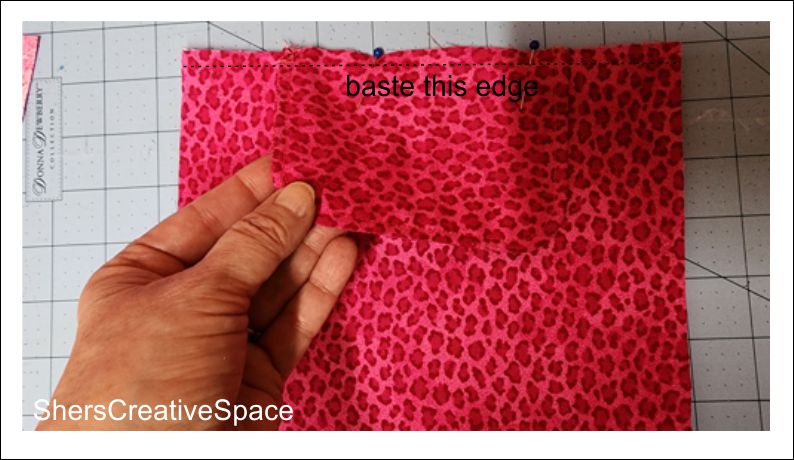
Place this pocket piece on the right side of one of your outer fabric pieces so that the side with the mock binding is facing up. Line up all the side edges and the bottom edges. Machine baste around these three edges 3/8 inch from the edges. Set aside for now.


Create your flap by placing the two small flap pieces of fabric with right sides together. Using a pen, pencil, or marking tool, draw lines where your seams will be, which is 1/2 inch away from the edges. I like my corners rounded so I just grabbed a votive candle that was nearby and used it to make my curves. I drew my lines on the piece with the interfacing so it would be easy to see during stitching.

Stitch the flap pieces together by stitching on the lines you just drew. Leave the upper (straight) edge unstitched. By stitching on the lines, this will make your curves much neater. Trim seam allowances and clip curves. Turn right side out an iron. Stitch about 1/4 inch away from the edges to give it a finished look.


Place the flap on the upper edge of your outer sleeve piece with the outer edge of the sleeve piece against the flap. This will be stitched to the side that the pocket is not on. Be sure to center it along that upper edge and baste in place about 3/8 inches away from the edges.

Place the two outer pieces together with right sides together and secure with clips or pins. Stitch around the sides and bottom using a 1/2 inch seam allowance, leaving the upper edge open. Trim away excess seam allowance and clip corners. Turn right side out and press.

Stitch your lining pieces along the sides and bottom, with right sides together, using a 1/2 inch seam allowance. You will leave the upper edge open. It's also important to leave about a 2 to 3 inch opening in the center of the bottom for turning right side out when you are finished. Cut away excess seam allowance and clip corners. Do NOT turn right side out.

Slip the outer part of the sleeve inside the lining piece. The right sides of the sleeve outer fabric and sleeve lining fabric will be facing each other, and the upper edges will line up with each other. Pin along the upper edges to hold in place for now.

Stitch all around the upper edge using the 1/2 inch seam allowance. I like to go around twice, but you don’t have to. Cut away the excess seam allowance about 1/4 inch from the seam.

Turn right side out through the opening in the bottom of the lining, then stitch the opening in the lining closed. Place the lining inside the case/sleeve and smooth out. Press. Top stitch along about 1/4 inch away from the upper edge.

Place your device inside the sleeve and mark where you’ll be placing your snaps. Finish by attaching the snaps to the pocket and the flap.

NOTE: If you don’t use a case for your device, place it inside the sleeve with the glass screen side facing the back. That way you don’t have to worry about pressing too hard to close your snaps.


Do you like free embroidery designs and tutorials?

Be sure to sign up for the weekly newsletter to get a free design every weekend (unless I'm running a sale). Sign up for Sher's Creative News

Saturday, June 17, 2023

Travel Journal & Sharing A Printable with You!


I'm a traveler. I love to travel. With my kids and parents at different locations in the US, I get the opportunity to travel often. When I get home I love to make travel journals, then convert them into PDF documents so I can read them whenever I want. I do this in my CorelDraw program but they can also be made in Microsoft Word, Samsung Notes, and so many other programs out there; many of which are free. While I'm traveling I like to remember everything so I upload journal pages into my note-taking app so I don't have to worry about forgetting anything. Once I get home, I combine my notes and some favorite photos in my travel journals.

My husband and I just came home from a two week trip through Canada. We covered four special locations in the eastern part. I'll be sharing some great information about them another time. 

I just added some free travel templates to my Nerdy Me page on my website. Feel free to snatch them up free of charge. I make them for myself so I like to share them with you as well.

If you are interested, you can find them at:

https://www.inthehoopbysher.com/nerdy-me.html

Enjoy!


Do you like free embroidery designs and tutorials?

Be sure to sign up for the weekly newsletter to get a free design every weekend (unless I'm running a sale). Sign up for Sher's Creative News

Wednesday, May 3, 2023

Larger Bags Listed and a Video to go With!

By popular request, I've finally gotten around to adding larger zipper bags to the shops. There will be more to come. I've been super busy in the studio stitching and designing new embroidery designs. I've also added a video to help with making the larger bags since they are slightly different than the smaller ones to make. Also, you won't find the "mom" bag in any of the shops yet. It's hiding to make it's appearance as a weekend freebie.

https://www.youtube.com/watch?v=_yH7L7Snags&ab_channel=IntheHoopBySher

Do you like free embroidery designs and tutorials?

Be sure to sign up for the weekly newsletter to get a free design every weekend (unless I'm running a sale). Sign up for Sher's Creative News

Thursday, April 27, 2023

Crafting in the Sixties


I recently came across some pictures of the things my Grandma made when I was a little girl. We've come so far since then! I have beautiful memories of crafting with her. She worked at a place called the Palette Party Shop. It was the craft store of that time. It was in an old late 1800's building on 38th in Broadway in Gary. I can still smell it as I write this. My sister and I would walk there after school and watch her and the other employees make party and shower decorations. I loved to play with the ribbon making machine. The shop was full of beads, felt, wiggle eyes, sequins, syrofoam, ribbon, lace, decorative pins, and crepe paper of every color imaginable. Things were so simple back then. I still have some of her actual projects. They are kept in a box because they are too fragile to handle.

Do you ever wish you could go back in time just for a day or so? Funny how special things can be when you look back at your past. We took those walks and visits for granted as kids but I do love the memories.

Tuesday, April 25, 2023

Some of My Favorite Apps


Since I've been blogging (lots of years), every now and then I make a post about my favorite apps. Of course these tend to change as more apps become available and more apps are updated. As of this writing, the following are my favorite apps:

1. Google Calendar - I suppose this will always remain on my list of favorites because it keeps my time so organized. I love the fact that along with the "events," it allows you to create tasks. I use the task feature as my daily to do list. The way I like to look at it is to go into the schedule and you have a nice list. I love that you can even add details to your tasks. You can even make recurring appointments for your events such as birthdays, bill payments, etc...

2. Readly - For around $12 a month, I can read unlimited magazines and even back issues. Every magazine I like, they have it. Each family member can have their own sign-in as well. I sure do get my moneys worth out of that one. And they have all the popular magazines and more!

3. Samsung Notes - This is my second brain! I used to pay for another note-taking app but since I discovered Samsung Notes, I like it even better. This app can only be used on Samsung devices and computers with Windows operating system. It syncs seamlessly among my devices. I love that I can annotate and create PDF documents on it. Between this and my calendar app, my life is so orgainzed! I might be obsessed over this one. And it's free!

4. Canva - I just discovered this one. I love it for creating ads. It's so quick to make them and I can do them from my computer or my tablet. I still use my drawing program but this is so handy.

5. Sketchbook - This is a nice drawing app. I no longer sell my artwork or clipart but I love to relax by doing some drawings.

That's my list for today. If you'd like to check any of these out, you can get them from the place where you get your apps.

Photo above: A picture of my sweet cat, Punkie. She lived to be almost nineteen and I still miss her every day.


Wednesday, April 12, 2023

Are You Ready for the Three Dune Challenge?


The photo on this blog post is one I took while hiking the dunes. Long before the park became a National park (was just a state park) they didn't have the "3 Dune Challenge." They had the three big and steep dunes, but they didn't call it a challenge. We locals just thought of it as "Trail 8." And it's a tough one! When I first started hiking that trail, I thought I was going to die. I had this vision of DNR arriving to my aid on their 4-wheel vehicles. By the end of that sumer after going about two or three days a week, I had them mastered. I can even say that I never had to stop and rest, just breezed on through! 

The hubster and I were talking about getting our season pass and making it a regular activity once again. It has been about 15 years since I've climbed those dunes and I just know that I'll be back to near death again the first time. Between age and added weight, it will be rough but I'm bound and determined to make it happen. That is my goal for 2023.

If you want to see what I'm talking about, I've dropped a few links below so you can check it out.

https://www.youtube.com/watch?v=-XZK2mWxljI

https://www.hikingproject.com/trail/7013463/trail-8-3-dunes-challenge

https://www.indianadunes.com/explore-the-dunes/indiana-dunes-state-park/3-dune-challenge/

What will you challenge yourself to do?


Thursday, April 6, 2023

The Benefits of Doodling


Did you know that doodling has beneftis? Did you know that it actually helps you concentrate on something else? Well, it does!

I was listening to a podcast which I like to do while I'm working, and the subject came up on a podcase called Something You Should Know which is a great one to listen to if podcasts are your thing. Instead of distracting you, it helps you concentrate on what's going on. When you doodle, you can better concentrate because your mind doesn't wander onto other subjects. So basically, it distracts you in a good way.

I was curious so I did a little research myself and I found the following two reliable links with great informaion:

https://www.health.harvard.edu/blog/the-thinking-benefits-of-doodling-2016121510844

http://online.wsj.com/articles/the-power-of-the-doodle-improve-your-focus-and-memory-1406675744

Who knew?

Thursday, March 2, 2023

Dreams Can Be Crazy - Keep a Journal for Them

Every night before I go to bed I wonder where I'm going to go before waking up. My dreams are so real that I really think I'm living them. Some are so crazy that I wonder how my mind can actually make them up.

I've recently been journaling them because some of them are so out there that I don't want to forget about them. They are actually fun to read later.

I'll share two favorites of mine that I never want to forget:

Our parents live in Florida and we were down there visiting one day (yep, 2000 miles for just the day) and they put out a big spread for lunch. The only thing funny about it was that the sandwiches were made from felt. Fabric felt sandwiches. Yummy!

My all time favorite dream was about three years ago. My friend and I were riding our bikes to the Gary, Indiana lakefront. I actually live by the lake several miles from Gary so I don't know why we rode to Gary instead of our own part of the Lake. The best part of the dream is that my friend and I were riding our bikes while carrying ironing boards. IRONING BOARDS! One of us got a flat so we stopped at a gas station to fix it. While we were there someone stole our wrench. I then said to my friend that we could buy another ironing board at WalMart for around $20 so we left our ironing boards at a laundrymat and went on our way. I seriously can't read that one without laughing.

If you plan to keep a journal for them, be sure to jot them down right after waking up. They are so easy to forget about if you don't do that. I always have a notepad everywhere in the house where I can quickly jot things down. If I don't have time in the morning, as long as I jot down some notes, I can record them in my dream journal later.

Tuesday, February 21, 2023

Designing Back In The Day


Long before PDF patterns and in the hoop embroidery designs there was Craft Magazine among many others. There were also so many hard cover craft and sewing books. It was so hard to get your designs published. You had no control over where your designs were used or seen. Once you submitted a design for publication, if you were accepted and hired, you usually signed away all rights.

One thing that was definitely different was the publication schedule. You'd submit your design in February or March, then if it was accepted, it would appear in their November or December issue. You also had to wait that long for your payment. It was fun and I was a regular designer for some of the publications but these days, it's so much easier for us designers. With that said, the competition wasn't as fierce as it is today. Today anyone can sell their designs and even their finished items. The internet has completely changed the sewing, embroidery, and craft design industry.

You want to know the worst part of it all? Back in 1993 when my first design was published in a magazine, I had to type the instructions on a typewriter! Can you imagine that? No backspace or delete button to be found. It would take me a week to get my instructions just right. Plus, different publishing companies had different requirements. One would want everything typed up with a two inch margin on the left and all pattern images had to be made with a technical pen while others wanted double spaced and wanted your pattern writing to be with a special blue pencil that didn't show up on copiers. I wonder if today's copiers could read that blue pencil?

I was so excited to get that first pattern published! Then when I saw it was on the cover, I was over the moon with excitement! I don't know if you can read the price on the image, but it was $3.95 back then. That's a lot of patterns for $3.95.

I'm sharing some links below about the pencil and technical pens so you can see what I'm talking about. Some of you might know already but the younger readers may not have heard about some of them. I didn't even know what a non-photo blue pencil or technical pen was until I was told to use them. I also want to mention that I dreaded using that pen. I had to use it for one of the publishing companies and it had to be filled with ink. I always made such a mess filling the pen!

https://margretputspentopaper.wordpress.com/2019/02/24/non-photo-non-reproducing-pencils

https://en.wikipedia.org/wiki/Technical_pen


Wednesday, February 15, 2023

Homemade Vanilla - So Easy!


If you've never made homemade vanilla, you really need to do it. It's so super easy. I made several batches last Christmas as gifts. I first had some when my daughter made them for Christmas about ten years ago. When it comes to flavoring your baking, it doesn't get better than that! If you plan to give some as gifts, you'll want to make it about three months before giving because the flavors need to mingle for that amount of time. How you make it:

Get yourself some glass jars (got mine from Amazon)

A bottle of liquor. I chose bourban, but any will work.

One vanilla bean for every one ounce of liquor.

Slice your vanilla beans down the length and put them in the glass jars. Pour liquor to fill. Set them to the side and give them a nice and vigorous shake every other day. That's it!

They really make great gifts especially if you're going for a baking theme.

Do you like free embroidery designs and tutorials?

Be sure to sign up for the weekly newsletter to get a free design every weekend (unless I'm running a sale). Sign up for Sher's Creative News

Sunday, January 29, 2023

Sculptures

One of my serious obsessions is sculptures of all kinds. I especially love to see the ones where the artist is mentioned and information is displayed. Here is one that I saw while leaving San Antonio. The thing about this one that got me excited was the old suitcases. I'm probably going to age myself here but those are the suitcases our family used when traveling as a child. I can still smell the rubber in my mind. This must have been so much fun to make! And the memories of long ago trips are now flooding through my mind.

And for the record....

We had the suitcases in navy and beige. We even had the toiletry case and hat box case. Do they even make hat boxes anymore? At least I don't think so in the United States.


Related Posts Plugin for WordPress, Blogger...