Showing posts with label Project. Show all posts

Thursday, July 3, 2025

Finding the Grainline and Why it Matters

I don't sew clothing, but I do make a lot of bags. I make bags for every purpose imaginable. If you sew clothes, curtains or bags, you need to know how important the grainline is. If you are using a woven fabric such as 100% cotton or a woven cotton blend, you need to pay attention to how you are laying your pattern pieces.

Woven fabrics are made up of lengthwise threads, and crosswise threads. It is important to know the difference when you are making something that needs to hang properly or where strength is needed. The best way to find the grainline is by looking at the selvage. The grainline always runs parallel to the selvage. But sometimes you may have a piece of fabric where the selvage has been cut away, or maybe the fabric is an odd shape. Finding the grainline is very simple and I’m going to show you how. You can use the images above for reference.

The crosswise grain has a slight amount of stretch. It’s strong (as far as holding its shape), but not nearly as strong as the grainline, or sometimes called the lengthwise grain.

The lengthwise grain has no stretch at all. This would be the grainline. Can you see why this would be stronger and holding its shape when you are making a purse where it will be holding weighted items? If you are making a purse for example, you'll want the lengthwise grain to be vertical. This way there would be no "give" in the fabric and it will hold its shape. If you are making a matching strap, you definitely want to cut the fabric along the grainline for the length of the strap.

The bias has a lot of stretch. This would be at a 45° angle from your grain lines. When you pull the fabric along the diagonal, you get a lot of stretch. That is why you would cut a bias tape in this direction. The stretch allows you to go around curves easily. 


Sign up for Sher's Creative News so you don't miss anything!

There's a free machine embroidery design in every issue (unless I'm running a sale). You'll also find links to free sewing tutorials and articles too. The newsletter goes out once a week.  

Thursday, April 17, 2025

Gallery Glass - Great Idea for a Kid's Craft


I don't mean to brag but...I am the lucky Nana to a smart, beautiful, thoughtful, and talented girl. OK, maybe I bragged a wee bit! She likes to spend weekends with us, and it always must be two nights. Her rule, not mine. That leaves lots of time to work on craft projects and she loves to do craft projects. I've already introduced her to my sewing machines.

One of the projects we recently did was with Gallery Glass. I purchased the kit at Amazon, but I also found it at WalMart. What's great about this paint is that you use it right out of the bottle. There are no messy paint brushes or dirty paint water. It's great for kids because they use the bottle for the painting, which is much easier than using a paintbrush. I did some research to make sure it's kid friendly and it is. It's non-toxic and water based. Of course you'll want to supervise, especially with younger children.

Always make sure that you use a protective product over your work surface. You'll also want to use some alcohol to wipe down the glass so there will be no oil or dirt left behind. Also stress the importance of trying not to touch the glass (painting area) with your fingers. If using it on a glass, candle cup or other type of holder, it's easy to hold the item placing your hand or fingers inside while you are painting the outside. 

Once your area and glass are ready, you draw your picture or design with the black "leading" which is kind of like a 3-dimensional paint. You need to let that completely dry before continuing. Once it's completely dry, you fill in the areas with the colored paint.

I happened to have these glass bowls left from a couple of parties that we hosted. They were used for the centerpieces, and I hated the thought of getting rid of them and I'm glad I didn't. I also have a box of flameless votive candles which worked perfectly inside. My granddaughter can use it in her room and doesn't have to worry about forgetting to blow out a candle or catching the place on fire. I personally prefer those over real candles lately. They really look real too. I'll share the links to these things below. 

If you are looking for a great kid's project, this one is easy and inexpensive. These would also make great gifts for the elderly or hospital patient when given with a flameless candle.

Links:

Flameless candles

Gallery Glass


Sign up for Sher's Creative News so you don't miss anything!

There's a free machine embroidery design in every issue (unless I'm running a sale). You'll also find links to free sewing tutorials and articles too. The newsletter goes out once a week. 

Tuesday, December 3, 2024

December - Mug Rug of the Month Tutorial


You can find December design right HERE

Be sure to download the pdf document to your computer for printing. It's been my experience that the internet pdf viewers are horrible for printing. They also tend to leave out images such as pattern pieces.

You can find all the monthly designs HERE.


Don't miss the next Mug Rug of the Month pattern! 

Sign up for Sher's Creative News

There's a free machine embroidery design in every issue (unless I'm running a sale). You'll also find links to free sewing tutorials and articles too. The newsletter goes out once a week. 

Thursday, June 13, 2024

Tutorial - Super Quick and Easy Cord Tamers


If you have an embroidery machine and make key fobs, I'm pretty sure you have a whole bunch of vinyl scraps and kamsnaps laying around. Here is a project that couldn't be any easier.

Cut your scraps into strips of various widths and lengths

Apply a set of kamsnaps to each one

Wrap around your cables and cords to keep them  neat and tidy.

That's it!


Sign up for Sher's Creative News

There's a free machine embroidery design in every issue (unless I'm running a sale). You'll also find links to free sewing tutorials and articles too. The newsletter goes out once a week. 

Friday, May 31, 2024

June Mug Rug of the Month Tutorial

You can find June design right HERE.

Be sure to download the pdf document to your computer for printing. It's been my experience that the internet pdf viewers are horrible for printing. They also tend to leave out images such as pattern pieces.

You can find all the monthly designs HERE.


Don't miss the next Mug Rug of the Month pattern! 

Sign up for Sher's Creative News

There's a free machine embroidery design in every issue (unless I'm running a sale). You'll also find links to free sewing tutorials and articles too. The newsletter goes out once a week. 

Monday, April 1, 2024

April Mug Rug of the Month Free Pattern


You can find April design right HERE.

Be sure to download the pdf document to your computer for printing. It's been my experience that the internet pdf viewers are horrible for printing. They also tend to leave out images such as pattern pieces.

You can find all the monthly designs HERE.


Don't miss the next Mug Rug of the Month pattern! 

Sign up for Sher's Creative News

There's a free machine embroidery design in every issue (unless I'm running a sale). You'll also find links to free sewing tutorials and articles too. The newsletter goes out once a week. 

Wednesday, June 21, 2023

Blog Tutorial - Tablet Sleeve with Pocket


When I travel I like to take my tablet with me, or if I know I'll be waiting for an appointment I'll grab it as well. This way I can get some work done. Sometimes I take my little keyboard, and sometimes I don't. But I always seem to have papers, so it was important for me to include a pocket that will not only hold these items, but is also secure. I came up with this one and it works perfectly! I'm going to show you how simple it is to make yours, custom to your tablet or device. It's a perfect fit and not too snug.


Supplies

100% cotton fabric for outside, pocket, and flap

100% cotton fabric for sleeve lining and pocket lining

Fusible fleece interfacing

Medium weight fusible interfacing

Amounts for the above supplies will depend on how large your tablet or device is. My dimensions are for the Samsung Galaxy Tab 6 Lite


KamSnaps were used for my tablet, but you can use any type of closure you want

Thread to match fabric

General sewing supplies will also be needed such as pins, needles, cutting tools, marking pens, sewing machine, and iron.


Preparations

Measure the width of your device, plus the depth. Mine measured 7 1/8 inches, so I rounded it up to 7 1/4inches. Next, measure the length plus the depth. Mine measured 10 1/4 inches. If you want your case/sleeve to fit perfectly, it's important to take accurate measurements and keep your seam allowances as directed in the instructions.

  
If you keep your device in a protective case, be sure to have it on when taking your measurements. You can use this sleeve without the protective case if you choose, but I personally like the protective case on mine even when it’s inside the fabric sleeve. The case makes it easy for me to use it at a slant on a table if I need to.

Using the measurements that you took of your device, you are going to add 1 1/2 inches to the width, and 1 1/4 inches to the length. 

Since my tablet measured 7 1/4 x 10 1/4, my fabric cuts for the outer sleeve and lining will be 8 3/4 x 11 1/2 inches. This additional amount will be for the seams and the excess bulk.


Cut the fabric as follows

From the new measurements above, cut out 2 outside pieces, 2 lining pieces, and 2 pieces of fusible fleece interfacing. These will all be the same size. For my Samsung tablet, they will all measure 8 3/4 x 11 1/2 inches. Use the measurements you took for your device.

For the pocket, you will cut a piece of outer fabric, and medium weight fusible interfacing the same width that you cut for your sleeve, but an inch shorter for the length. For the pocket lining, you will cut it the same size as your outer sleeve pieces from your lining fabric.

Once you have decided how large you want your flap, you will cut that size from outer fabric (two pieces) and fusible interfacing. Be sure to take into account the 1/2 inch seam allowance all the way around. I wanted to make sure that mine was long enough to close over the pocket to keep papers or other items from slipping out.

NOTE If you only have lightweight fusible interfacing, you can double up on it. That was my case so that’s what I did.

Assembling your sleeve

Fuse the fusible fleece to the backside of each outer tablet piece. Fuse the medium weight fusible interfacing to the backside of the flap, and the other piece to the backside of the outer pocket fabric.

Be sure to follow manufacturer's instructions for the fusible products you are using.

Place the outer pocket piece and the lining pocket pieces right side together. Your lining fabric will be an inch longer. That’s the way it’s supposed to be. Run a row of stitching along the upper edge of your pocket, stitching the two pieces together 1/2 inch from the raw edge.

Place these pieces on the ironing board with the lining side facing you. Pull the lining up and iron the seam just like that. Then flip the lining over to the backside of the pocket and iron in place. This will create a mock binding. Pin to secure. Stitch along the “binding” close to the edge near the seam. Stitch a row of basting stitches down each side about 3/8 inches away from the edges. You will have a little excess at the bottom of the pocket where the lining and the outer pocket doesn’t meet up evenly. Just cut the excess away so they are the same length.

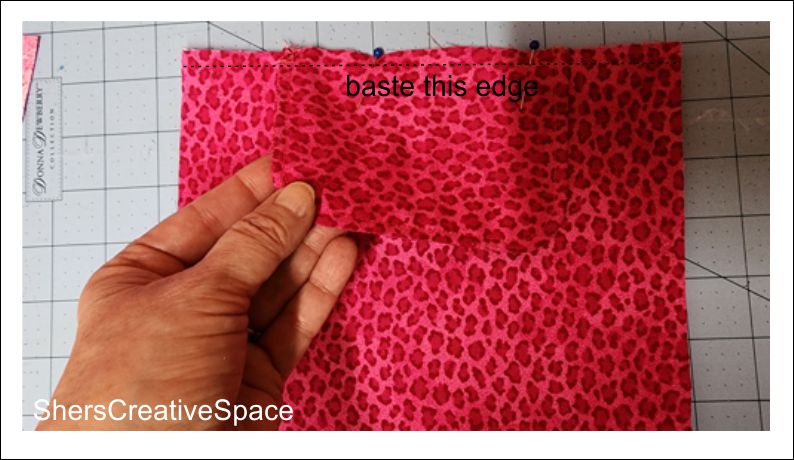
Place this pocket piece on the right side of one of your outer fabric pieces so that the side with the mock binding is facing up. Line up all the side edges and the bottom edges. Machine baste around these three edges 3/8 inch from the edges. Set aside for now.


Create your flap by placing the two small flap pieces of fabric with right sides together. Using a pen, pencil, or marking tool, draw lines where your seams will be, which is 1/2 inch away from the edges. I like my corners rounded so I just grabbed a votive candle that was nearby and used it to make my curves. I drew my lines on the piece with the interfacing so it would be easy to see during stitching.

Stitch the flap pieces together by stitching on the lines you just drew. Leave the upper (straight) edge unstitched. By stitching on the lines, this will make your curves much neater. Trim seam allowances and clip curves. Turn right side out an iron. Stitch about 1/4 inch away from the edges to give it a finished look.


Place the flap on the upper edge of your outer sleeve piece with the outer edge of the sleeve piece against the flap. This will be stitched to the side that the pocket is not on. Be sure to center it along that upper edge and baste in place about 3/8 inches away from the edges.

Place the two outer pieces together with right sides together and secure with clips or pins. Stitch around the sides and bottom using a 1/2 inch seam allowance, leaving the upper edge open. Trim away excess seam allowance and clip corners. Turn right side out and press.

Stitch your lining pieces along the sides and bottom, with right sides together, using a 1/2 inch seam allowance. You will leave the upper edge open. It's also important to leave about a 2 to 3 inch opening in the center of the bottom for turning right side out when you are finished. Cut away excess seam allowance and clip corners. Do NOT turn right side out.

Slip the outer part of the sleeve inside the lining piece. The right sides of the sleeve outer fabric and sleeve lining fabric will be facing each other, and the upper edges will line up with each other. Pin along the upper edges to hold in place for now.

Stitch all around the upper edge using the 1/2 inch seam allowance. I like to go around twice, but you don’t have to. Cut away the excess seam allowance about 1/4 inch from the seam.

Turn right side out through the opening in the bottom of the lining, then stitch the opening in the lining closed. Place the lining inside the case/sleeve and smooth out. Press. Top stitch along about 1/4 inch away from the upper edge.

Place your device inside the sleeve and mark where you’ll be placing your snaps. Finish by attaching the snaps to the pocket and the flap.

NOTE: If you don’t use a case for your device, place it inside the sleeve with the glass screen side facing the back. That way you don’t have to worry about pressing too hard to close your snaps.


Do you like free embroidery designs and tutorials?

Be sure to sign up for the weekly newsletter to get a free design every weekend (unless I'm running a sale). Sign up for Sher's Creative News

Monday, January 14, 2013

Operation Wheelbarrow Restoration


My husband loves to restore old things back to their original glory. This wheelbarrow has been in his family for over 60 years. He loves working in the yard and he uses this wheelbarrow all the time.

As you can see in the lower photo, this thing was in seriously bad condition. Instead of buying a new one, he knew that he could fix this one up. He has a friend who owned a powder coating business so he took care of the steel parts. Brian purchased new handles, nuts, and bolts, and then rebuilt it. Can you believe it's the same wheelbarrow? I saw those old handles, and quite honestly, I'm surprised they didn't fall apart they were so rotted!

Images in page from "Thoughts of Summer" Clipart kit available at my Etsy Shop.

Tuesday, September 4, 2012

I'm Such A Loser!


Another goal has been met. As of this past weekend, I've lost a total of 20 pounds! At first it was slow going down a very rough road. Now, I've got a good grip on things and it seems so much easier. There are many things that have helped me along the way such as a supportive family, having access to our own elliptical (more on that later), and a husband who is a pro at watching what the eats and making sure that he works out regularly. Those are just to name a few.

One of the things that has been a big help to me is my myfitnesspal.com (screenshot above). It's a website where you can log your weight, measurements, food, and exercise. They also have a community if you are interested. I don't join in on conversations or groups, but I find the smartphone app helpful to log my progress. It remembers the foods you use most often and it also stores your favorites so you never have to enter that food again, you just scroll down to it. It tells you how many calories you have at the start of your day, then adjusts as you eat and exercise. You know exactly how many calories you have left. My favorite part is at the end of the day when you choose "complete" and it says, "If you eat like this everyday, in five weeks you will weigh 135 pounds." Or whatever the case might be.

And it's all FREE!!! Free is good! This has been a big help to me. I think that logging and keeping track of my progress has added to my success. Whatever program you use, it does help to keep a log.

Images in the photo above are from my "Health and Fitness" clipart/graphic sets which are available at my website, clipart shop, and Etsy.

Thursday, August 16, 2012

Craft & Sewing Tip - Don't Rush!


It's probably one of the first things we learn but it's also the mistake we make most often. The photo above shows what can happen when we rush. I remember the moment exactly.

I thought I'd quickly finish up some bags while waiting for our homemade pizzas to bake. Yes, mine was healthy. Anyway, all I had to do was add the embellishments after they were completed. It was the final step. I grabbed my paint and didn't shake it very well, I didn't have much time, because I was in a hurry. I also didn't take the time to test the paint on some scrap fabric before applying it on my little bags. BIG MISTAKE! Had I waited until after dinner when I wasn't so rushed, I would not have ended up with the face you see on the ghost to the left. Needless to say, I had to make another bag, with another hand appliqued ghost later that evening. So my rush to finish the job quickly actually took about an extra hour and a half.

Have you ever flubbed like that because you were trying to SAVE time?

Witch grouping in the image above can be be found in my "Halloween & Fall Graphic/Clipart Set" that is available at my Website, Etsy Shop, and Teacher's Notebook Shop. Links at the right.

Saturday, August 11, 2012

"Crafts 'n things" Feature - Trick or Treat Bags


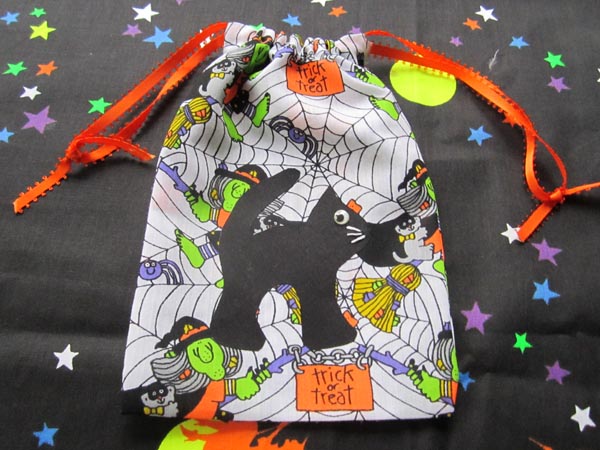
The September/October issue of Crafts 'n things magazine is out. If you turn to page 16, you will find my Halloween Trick or Treat Bags. The bags are fully lined so they are nice and strong to hold lots of candy on Halloween night. After the night is over and the candy is gone, these make great little travel bags for kids! You can even make them out of plain fabric for all year round! Everyone who knows me well, knows that a it's my personal opinion that black cats are all year long! Just ask Punkie!

This magazine is also packed with so many fun Halloween and fall projects. I'll be heading out to pick up some polymer clay this weekend because I'm going to make the little "autumn owl pins" that I saw on page 31. I think I'm going to put magnets on the back of some as well.

If you want to make my trick or treat bags, super cute owl pins (looks easy too), or any other fun projects, pick up your copy at a magazine stand near you!

They also have a great website if you want to visit it:

Well, I'm off to hit the elliptical. Gotta get my 45 minutes in!

Sunday, August 5, 2012

Thank You Pattern Testers

I want to say a big THANK YOU to my pattern testers! These five ladies took the time out from their busy schedules to test my most recent pattern which is now available on my website, at Craftsy, and in my Etsy shop (links at the right). The pattern is for three different drawstring bags that can be made in three different sizes. The smallest is perfect for a small gift, party favor, or treat bag. The largest would hold a nice sized gift. Below are their versions of my pattern. Be sure to stop by the blogs and shops of these talented ladies.

 LeAnn from Pasque Flower Creations


Kim from Tall Giraffe


Sarah from DeMoss Designs


Val from Valerie Daisy


Alexis from Hugs and Stitches


Saturday, June 2, 2012

Zipper Bags


I just love quick little projects! I also love to learn new techniques. I've been wanting to make myself a little zipper bag to throw in my purse to hold those tiny little items that will just get lost in the bottom. I was never happy with the way my zippers came out. I'm not sure if they didn't look even, or maybe, they just looked unprofessional, and unfinished. I did some research on zipper techniques and I found a great tutorial on a really cute blog. After I decided that this was the little bag I wanted to make, it took me another hour to head into my sewing room because I got lost on her blog. She's a talented seamstress and her blog is fun and interesting.

I can think of a thousand things to use these little bags for. You can adjust the size as you wish. She gives you a great tip as to how big the zipper should be in relation to the fabric. Each bag took way less than an hour, in fact, you can probably make them both in about an hour. What a cute way to present a little gift to someone too.

Pop over to her blog (link below), check it out, and you might want to make a couple bags for yourself too. So easy!!! I'm off to Etsy now to order some more zippers.

Click Here to Visit Kelly's Blog

Thursday, May 10, 2012

Swiffer Favorite - Revised


 A while back I wrote a post about one of my favorites as a do every now and then. In this post I wrote about my Swiffer 360 Duster. I got a lot of comments from people loving them, to people who thought they were a bit costly to use all the time. I knew that if I googled "homemade swiffer refills" I'd find the happy medium.

I actually found several tutorials, images, and even people selling them on Etsy. I came across one tutorial which jumped out at me so I thought I'd give it a try. I made two of them and I love them! Not only will it save me money in the long run, but it is so much better for the environment because you wash and reuse, instead of throwing away and replacing.

And if you've never used a Swiffer Duster, you are spending way too much time dusting!

Here's the link to the tutorial, Swiffer Duster Refills. You're going to love her blog too! Her duster also came out so much prettier than mine.

NOTE: You will notice in the picture below, there are two different handles. The one on the right is the newer version. I found that it slipped out very easily so I simply stitched a seam up the center over the first seam. This stitched all 8 layers together, which made two separate casings instead of one, which gave a more snug fit.


Sunday, April 22, 2012

My New Sewing Room


The moment has arrived! It's time to show you my new sewing and craft room. The only thing left to do is to build a new work table but that will have to wait until after summer projects that Brian plans to get done around the house. For now this table suits my purpose. The big cabinet behind the table is actually a Murphy bed. When I have overnight guests, I simply fold up the table and pull down the bed. I hope you like a lot of pictures!


Here it is from another angle. Yes, I do use that file organizer (long thing on the wall) that I sell the pattern for. It comes in quite handy. You might also notice the portable ironing board that I made for my room. If you click on my "Tutorials" tab at the top, you can see how to make your own. After I buy new bed linens, I'll show you the room when it is turned into a guest room.


If you follow my blog regularly, you've already seen this awesome wall of shelves that hubby built for me. The top shelves are covered because it hides the ugly stuff.


On to the details... I have photos throughout the room of those most near and dear to me. I even have one shelf dedicated to display a few of them. I also have a great spot to hang my favorite aprons. It's my new souvenir collection. It's a fun thing to collect while on vacations.

You see the baskets on the bottom shelves of the units next to the Murphy bed (top picture). Those are empty for now, but I thought they'd be handy when the room turns into a guest room. My guests will have little "drawers" to stash things in. The sewing machine table will become a writing desk or a place for my kids to use their laptops when they are visiting from Delaware. Right now you see a blanket next to the sewing machine. That is Punkie's favorite place to lay.


I found these bed risers laying around. They lift my table up to a comfy level for crafting. And these great storage containers have been on sale at Michael's. I'm going to get two more. They are perfect for storing the tiny scraps.


I actually have 4 areas for storing fabric. Here is where you'll find my 100% cottons which I use mostly. I also have a cabinet along the wall by the sewing machine where I store my smaller fabric piles (3/4 yard and under), I also have those storage containers (photo above this one) where I store the tiny scraps, and I use the top shelves of the new shelves to store felt and decorating fabrics.

My cutting tools, pencils, rotary cutters, and decorative edge scissors are so handy in these little mugs and flower pot.


I love the pretty glass jars for storing the colorful stuff! The photo in the left picture is of my grandmother who actually gave me the creative gene. I can remember hours of crafting when I would visit her. This picture was taken in the 1920's but you can tell that by her hairstyle.


And it all started with the plans above! I hope you have enjoyed my tour. I love my new room and I love the man that made it possible for me. A big thank you to my awesome husband!!!

Friday, March 23, 2012

My Sewing Room is Coming Along!


I wasn't going to show this yet because it's still not close to being complete, but just I couldn't wait. It's functional and it still doesn't look half bad. My room is coming along nicely. As I show the pictures, I'll explain what will be changed. Remember that this room will also convert quickly into a comfy guest room for when family is in town.


The photo above is what you see when you first walk into the room. Right now my sewing machine sits on a utility table. Brian will be making me a nice, wooden sewing table. It will convert to a desk when my kids are visiting from out of town. I can see their laptops on it now. All I have to do is remove the sewing machine and they have a nice desk.

~We will also be purchasing a TV that will be on a hinged arm. I have another place in mind for the quilted wall hanging when we get that, like on the wall that will be seen when the Murphy bed is opened.


This will be a fully functional wall. The big cabinet that you see in the back is actually a Murphy bed that we built. The bed will pull down when guests are staying and in the closed position, it only takes up 16 inches of floor space. I'm still shopping for some pretty bedding.

What will change:
~Where you see the drawers next to the wall unit will be shelves that will take up the entire space. I purchased large baskets for the bottom shelf on each side so guests will have a nice little stash place to put personal items.

~The 6 foot white table will be replaced with a wooden table that Brian will be making. It will be 4 feet by 4 feet and the top will flip upright on a hinge for storage. It will be on a wheel base that can lock in place when the table is open. When guests are here, I will flip it up, unlock the wheels, wheel it out, and I can then pull down the bed.

~Where you see the picture on the left side will also be a hanging file organizer which I'm making now. Hmmmm, do I see a tutorial in the works?


Here are the first set of shelves my totally awesome husband built for me. I wanted some covered storage but didn't want wooden doors, I wanted something with a softer look. I bought these spring rods for about $3 a piece and made simple little curtains to hide the ugly stuff. I really love the look of this unit!


I've had this cabinet for years. I have it filled with felt squares and felt by the yard. The photo on top is a scrap page of Brian and me. The basket on the right is filled with Yankee candles. My favorite indulgence.

As you can see, it's coming along nicely. I'll post more pics as I add the new furniture. He plans on making the shelves for the other wall next, then I think he'll take a break and do yard work before making my tables.

He definitely is the BEST HUSBAND EVER!

I'm tired, it's been a long day and I'm heading to bed. I'll visit you all shortly.

Saturday, March 17, 2012

Tutorial: Ironing Board For Crafting

ironing board pattern, ironing board tutorial, sewing pattern, sewing tutorial, blog tutorial, craft tutorial, free pattern, free tutorial
I whipped this crafting ironing board up in just over an hour. No more big ironing board and no more unstable tabletop ironing boards. The tabletop boards are too skinny to even work with. I chose one of the fabrics that coordinate with my sewing room, but any 100% cotton fabric would work. As for the bath towel, any old thing will work. See the horrible thing I found in the laundry room (a couple images down). I'm really happy with the way this board turned out.

Supplies:
1/4" plywood or luan
Old thick bath towel
3/4 yard of 44"/45" fabric (I used a med weight decorator fabric)
Thread to match fabric

General sewing supplies: needles, pins, scissors, ruler, sewing machine, iron, cutting mat & rotary cutter (optional)

NOTE: If you will be making your board a larger size than mine, take that into consideration when choosing fabric. With my board being 16" from top to bottom, this allows plenty of excess fabric to fold to the back. If making a much bigger board, you will need to choose a fabric that is bigger than 44/45 inches.

Cut your plywood to desired size. I had mine cut 16" x 23"  If you don't have the tools to cut the wood, your home store or a friend can do this for you.

Fold the old bath towel in half and lay your plywood on top with the bottom edge of plywood (the 23" long edge) at the fold of the towel. Cut the fabric about 1" away from the plywood along each side, and the upper edge.

TIP: This is something you will want to do outside because the little loops in the terrycloth will be all over the house. Be sure to shake it good after cutting. 


Leaving the towel folded, stitch up each side with a 3/4" seam allowance. Leave the top edge open. Take it back outside and cut away some of the seam allowance, shake again. This will reduce the bulk at the edges. 


Turn right side out and slip the board inside as if you were stuffing a pillowcase. I just slip stitched the open edge closed. I used large stitches with contrasting (heavy duty) thread so that I will be able to remove them quickly if I ever need to launder this piece. These stitches will never show.
 
Since different towels are different weights, or in the event that you cut your board a different size than I cut mine, wrap a tape measure around the board/towel along the widest edge, but don't pull tight. Mine measured 50" so I divided that by two and added an inch which means I'll be cutting my fabric 26" wide. You will be using a 1/2" seam allowance which will give the outer fabric a nice, snug fit.


With your fabric in half so that your selvages are meeting at the top, cut the fabric to your desired width. Mine is 26" wide which gives me a piece of fabric 26" x 45" when opened up.


 Fold in half with right sides together (selvages meeting at the top) and stitch each side, leaving the top open.


Trim away about 1/4" from the seam allowance to reduce bulk. You can finish the edge of your seam allowance if you like by running a zig-zag stitch along the edge you just trimmed.


Turn right side out and slip the covered board inside. Flip the excess fabric to the back.


I turned my edges in slightly and stitched the sides to the back of the board. This only took a few minutes and will be easy to remove the stitches when cleaning or replacing this outer fabric. You also have the option of attaching snaps, eye hooks, Velcro, or other fasteners if so desired.


Do you like free embroidery designs and tutorials?

Be sure to sign up for the weekly newsletter to get a free design every weekend (unless I'm running a sale). Sign up for Sher's Creative News

Related Posts Plugin for WordPress, Blogger...