Showing posts with label DIY. Show all posts

Monday, July 7, 2025

Travel Tray Pattern

I seriously can't stop making these! It doesn't get any easier than this. I've seen this little tray all over the internet, so I decided to create a pattern to share with my creative friends. They are so easy and so quick, you can make a bunch of them in no time. I'll bet they would be great sellers for your craft shows or Etsy shop. You can make them in any size you want. 

I made the first one for myself for our travels. They are perfect for setting on the dresser of a hotel or guest room to hold your small items. In my case, my husband kept throwing his pocket full of change into mine. The germs and gritty feeling of money creeps me out. So, I made him a smaller one just for that purpose. Now I can keep mine nice and clean.

I shared the tutorial awhile back but I've turned it into a PDF pattern so you can download it and print it out if you like. Personally, I like to read patterns from my tablet to save on paper and ink. You can find the download right HERE

If you prefer the tutorial on the blog, you can find that HERE

I'm slowly going through all my tutorials, and I'll be turning them into PDF documents. Keep watching either with my weekly mailer or follow this blog.


Sign up for Sher's Creative News so you don't miss anything!

There's a free machine embroidery design in every issue (unless I'm running a sale). You'll also find links to free sewing tutorials and articles too. The newsletter goes out once a week.  

Tuesday, April 29, 2025

Tutorial - Turn Any Small Toiletry Bag into a Hanging Bag!

I have been on the hunt for the perfect hanging toiletry bag for travel and have not found one. We just scheduled a (2 overnights) trip on the California Zephyr. It's our first rail trip and I've been doing my research. One of the things I've heard over and over again is that you want to hang your toiletries for two reasons. First, you do not want to set it down on the sink because it has been used by so many people before you. Second, there isn't much room anyway. So of course I continued with my search. Found nothing that I liked as much as the ones that I've been using for probably about ten years. I just really love these bags because when I made them, I really took my needs into consideration. Plus, anyone who know me, knows that I travel like a minimalist. I take the least amount possible and pack ultra light. If you'd like to hear more about this technique, drop me an email or comment right here. I have it down to a science now. Checking bags has gotten so expensive and it seems like halfway through boarding they always start gate checking carry-on bags anyway. But I think the thing I like most about packing everything in a personal size backpack is that my stuff will never get lost. It's also nice to have all your stuff with you and it's so much easier to throw it over your shoulder than lugging a suitcase around. I'm in my 60's and I still find it easier! 

NOTE: The bag located at the bottom of the image is a pattern by Andrie Designs which could be found HERE.

I decided to keep my well loved bags and just make an attachment that can turn it into a nice hanging bag. If I'm going somewhere that I don't know how much counter area I'm going to have, I throw a suction cup in my bag so I can hang it from the mirror if needed. But like I said, I take very little with me so if you have a whole lot of toiletries and your bag is heavy, this will not work for you. These seriously took me  minutes to make! If you prefer the PDF version of the pattern, you can click right HERE.

What you'll need to make the tab:

100% cotton fabric, scraps that will match or compliment your toiletry bag

Fusible fleece interfacing, scrap (you can also use a piece of felt or cotton batting in place of fleece)

Dimensions for the above supplies will depend on the size of your toiletry bag

Thread to match fabric

5/8” wide ribbon, 2 1/4 inches long

Long Prong KamSnaps were used for my project, but you can also use velcro or sew-in snaps

Large S-Hook or carabiner clip

General sewing supplies will also be needed such as pins, needles, cutting tools, ruler, marking pens, sewing machine, and iron.

NOTE & TIP: I strongly recommend using the long prong KanSnaps. I purchased mine at Etsy. I tried the regular ones for this project and they kept popping off. I switched to long prong and have no problems. Also, if you are going to make a hanger tab for one of those clear vinyl bags, regular KamSnaps will be fine. To add a little more strength to a vinyl bag, I would cut a narrow strip of medium to heavy weight interfacing or felt. Place this between the snap and the bag.

I feel that five snaps are best because it provides more strength.


Create your pattern piece (or use the one that is with the PDF instructions linked above and below).

If designing your own tab, remember that you will also be using a 1/4 inch seam allowance all the way around.

From your pattern piece, cut two from the cotton fabric, and one from the fusible fleece interfacing. Iron the fusible fleece interfacing to one of the backs of the fabric pieces. Be sure to follow the manufacturer’s instructions for the fusible product you are using. If you are using cotton batting or felt for this piece, just baste it along the edges to the back of one of the fabric pieces about 1/8 inch away from raw edge.

Fold the piece of ribbon in half with wrong sides together. Place it on the upper portion of one of the fabric pieces. The fold will be toward the bottom and the raw edges will be even with the raw edges of the fabric.

Place the remaining fabric piece on top of this. The right sides of the fabrics will be facing each other and the ribbon will be “sandwiched” between the two.

Beginning at the bottom edge, stitch around using a 1/4 inch seam allowance, leaving about 2 inches open in the bottom for turning.


Clip at corners and turn right side out. Gently push out corners and iron. Fold the edges to the inside where you left it open and press.

Stitch about 1/8 inch away from the edge all the way around the tab.


Find the center of the tab, closer to the bottom and use the pointed object that came with your snaps to make a hole. Place this on the toiletry bag and make a hole in that using this hole as a guide. Then make two more holes on each side of the center hole about one inch apart. Attach your snaps using the instructions for the snaps you are using. If you are using velcro (not my first choice) or large sew-in snaps instead, stitch them at those markings (do not make holes if using snaps or velcro).


Snap the tab to the bag and slip your hook or carabiner through the ribbon. You now have a hanging bag!

FOR THE FREE PDF PATTERN CLICK HERE


Sign up for Sher's Creative News so you don't miss anything!

There's a free machine embroidery design in every issue (unless I'm running a sale). You'll also find links to free sewing tutorials and articles too. The newsletter goes out once a week. 

Thursday, April 17, 2025

Gallery Glass - Great Idea for a Kid's Craft


I don't mean to brag but...I am the lucky Nana to a smart, beautiful, thoughtful, and talented girl. OK, maybe I bragged a wee bit! She likes to spend weekends with us, and it always must be two nights. Her rule, not mine. That leaves lots of time to work on craft projects and she loves to do craft projects. I've already introduced her to my sewing machines.

One of the projects we recently did was with Gallery Glass. I purchased the kit at Amazon, but I also found it at WalMart. What's great about this paint is that you use it right out of the bottle. There are no messy paint brushes or dirty paint water. It's great for kids because they use the bottle for the painting, which is much easier than using a paintbrush. I did some research to make sure it's kid friendly and it is. It's non-toxic and water based. Of course you'll want to supervise, especially with younger children.

Always make sure that you use a protective product over your work surface. You'll also want to use some alcohol to wipe down the glass so there will be no oil or dirt left behind. Also stress the importance of trying not to touch the glass (painting area) with your fingers. If using it on a glass, candle cup or other type of holder, it's easy to hold the item placing your hand or fingers inside while you are painting the outside. 

Once your area and glass are ready, you draw your picture or design with the black "leading" which is kind of like a 3-dimensional paint. You need to let that completely dry before continuing. Once it's completely dry, you fill in the areas with the colored paint.

I happened to have these glass bowls left from a couple of parties that we hosted. They were used for the centerpieces, and I hated the thought of getting rid of them and I'm glad I didn't. I also have a box of flameless votive candles which worked perfectly inside. My granddaughter can use it in her room and doesn't have to worry about forgetting to blow out a candle or catching the place on fire. I personally prefer those over real candles lately. They really look real too. I'll share the links to these things below. 

If you are looking for a great kid's project, this one is easy and inexpensive. These would also make great gifts for the elderly or hospital patient when given with a flameless candle.

Links:

Flameless candles

Gallery Glass


Sign up for Sher's Creative News so you don't miss anything!

There's a free machine embroidery design in every issue (unless I'm running a sale). You'll also find links to free sewing tutorials and articles too. The newsletter goes out once a week. 

Wednesday, April 9, 2025

Favorites - I Love These Machine Embroidery Supplies

Time for some more favorites! These are the four items that I use in my studio on a regular basis. 

Pre-wound bobbins are a massive time saver. I order a large box of white, and I also have them in several colors. The last thing I want to do when I need a bobbin is to stop and create some more. This way they are always on hand, and I don't have to stop what I'm doing.

Basting adhesive really makes stabilizing easy. I much prefer it over pins and tape. Sometimes, depending on what I'm stabilizing, I'll use it with pins. It makes such a difference when making things that require a layer of batting such as coasters, zipper bags, etc. I used to worry about it gumming up my needle, but after several years of use, it hasn't happened yet.

These snips make clipping threads neater. I don't use these for cutting away fabrics, but they are great when you need to clip that thread close to the stitching. They are so thin and lightweight. As for clipping away excess fabric for applique, I like to use my curved embroidery scissors.

Snag Nab-It Tool is probably the best thing ever invented for embroidery, sewing, and basic snag repair. It has a sharp point on one end, and a rough section on the other end. It's made to pull snags through to the back which turns a damaged sweater into like new. Have you ever finished a project, and everything looks beautiful except those one or two stiches in your silky satin stitches that the needle obviously missed? Of course you have! And it's not your fault. This tool is designed to make it look like it never happened. You just find the stitch that didn't stitch (or just sticking out in a weird way) and insert the pointed end right at that stitch on the top of the project. Then you gently push it completely through. The rough edges on the opposite end of the tool will catch that annoying thread and bring it right through to the backside. If you want you can put a tiny drop of Fray Check on the back where the stitch is but honestly, I've never worried about that. And you know these thread mishaps always happen at the end of your project after you've done all that work! TIP: Store it in the little plastic sleeve it came in and maybe put a dot of paint or nail polish on the plastic sleeve. This little thing is so easy to lose.


Sign up for Sher's Creative News so you don't miss anything!

There's a free machine embroidery design in every issue (unless I'm running a sale). You'll also find links to free sewing tutorials and articles too. The newsletter goes out once a week. 


Wednesday, March 26, 2025

Free Pattern - Phone Sleeve or Eyeglasses Case


I recently designed these phone sleeves which also makes a great eyeglasses case. A seasoned seamstress can whip these up in no time. I've also added lots of tips and notes that will make the pattern beginner friendly. A regular sewing machine is required for this project.

You can grab your pattern right HERE.


Sign up for Sher's Creative News so you don't miss anything!

There's a free machine embroidery design in every issue (unless I'm running a sale). You'll also find links to free sewing tutorials and articles too. The newsletter goes out once a week. 

Tuesday, December 3, 2024

December - Mug Rug of the Month Tutorial


You can find December design right HERE

Be sure to download the pdf document to your computer for printing. It's been my experience that the internet pdf viewers are horrible for printing. They also tend to leave out images such as pattern pieces.

You can find all the monthly designs HERE.


Don't miss the next Mug Rug of the Month pattern! 

Sign up for Sher's Creative News

There's a free machine embroidery design in every issue (unless I'm running a sale). You'll also find links to free sewing tutorials and articles too. The newsletter goes out once a week. 

Thursday, August 1, 2024

August - Free Mug Rug of the Month Pattern


You can find August design right HERE

Be sure to download the pdf document to your computer for printing. It's been my experience that the internet pdf viewers are horrible for printing. They also tend to leave out images such as pattern pieces.

You can find all the monthly designs HERE.


Don't miss the next Mug Rug of the Month pattern! 

Sign up for Sher's Creative News

There's a free machine embroidery design in every issue (unless I'm running a sale). You'll also find links to free sewing tutorials and articles too. The newsletter goes out once a week. 

Monday, July 1, 2024

July - Mug Rug of the Month Free Tutorial

You can find July design right HERE

Be sure to download the pdf document to your computer for printing. It's been my experience that the internet pdf viewers are horrible for printing. They also tend to leave out images such as pattern pieces.

You can find all the monthly designs HERE.


Don't miss the next Mug Rug of the Month pattern! 

Sign up for Sher's Creative News

There's a free machine embroidery design in every issue (unless I'm running a sale). You'll also find links to free sewing tutorials and articles too. The newsletter goes out once a week. 

Thursday, June 13, 2024

Tutorial - Super Quick and Easy Cord Tamers


If you have an embroidery machine and make key fobs, I'm pretty sure you have a whole bunch of vinyl scraps and kamsnaps laying around. Here is a project that couldn't be any easier.

Cut your scraps into strips of various widths and lengths

Apply a set of kamsnaps to each one

Wrap around your cables and cords to keep them  neat and tidy.

That's it!


Sign up for Sher's Creative News

There's a free machine embroidery design in every issue (unless I'm running a sale). You'll also find links to free sewing tutorials and articles too. The newsletter goes out once a week. 

Friday, May 31, 2024

June Mug Rug of the Month Tutorial

You can find June design right HERE.

Be sure to download the pdf document to your computer for printing. It's been my experience that the internet pdf viewers are horrible for printing. They also tend to leave out images such as pattern pieces.

You can find all the monthly designs HERE.


Don't miss the next Mug Rug of the Month pattern! 

Sign up for Sher's Creative News

There's a free machine embroidery design in every issue (unless I'm running a sale). You'll also find links to free sewing tutorials and articles too. The newsletter goes out once a week. 

Wednesday, May 1, 2024

May Mug Rug of the Month - Free Pattern!


You can find May design right HERE.

Be sure to download the pdf document to your computer for printing. It's been my experience that the internet pdf viewers are horrible for printing. They also tend to leave out images such as pattern pieces.

You can find all the monthly designs HERE.

This particular design has a surprise! I give you ideas for more options!

Don't miss the next Mug Rug of the Month pattern! 

Sign up for Sher's Creative News

There's a free machine embroidery design in every issue (unless I'm running a sale). You'll also find links to free sewing tutorials and articles too. The newsletter goes out once a week. 

Tuesday, April 30, 2024

Dry Shampoo Hack - Great Tip and so Frugal!


I don't remember where I saw this or how long ago it was but this simple and super cheap hack has saved my hair more than once.

For the past couple of years, I have discovered that my hair looks healthier (and the color last longer too) if I only wash it 2 or 3 times a week. Every time you wash your hair, you are also washing away important natural oils that your hair needs.

If you need to run out of the house and your hair is getting to the end of your hair washing break, or it's a little oilier than normal, this hack will have your hair looking fresh and beautiful. I find that this is best when done before bed if you plan to run out in the morning for a quick meeting or errand.

The simple ingredients.....cornstarch and baking cocoa. This does make sense because cornstarch absorbs moisture. And the cocoa powder is simply to take away the white powder look. I'm blonde so I just use a small amount. For dark hair, you can use more. 

***Just be sure not to let your cat or dog lick your hair because unsweetened chocolate is highly toxic to them.

I keep mine in the bathroom in a 1 cup size container and apply it with a large makeup brush. It's really that simple! That cup will probably last me a lifetime since I don't use it all that often. You can also put it in a shaker container and shake it on, then brush it out.

You only need to put it close to the scalp then give a good brushing or combing.


Don't miss any sewing tutorials, helpful tips, or free embroidery designs! 

Sign up for Sher's Creative News

There's a free machine embroidery design in every issue (unless I'm running a sale). You'll also find links to free sewing tutorials and articles too. The newsletter goes out once a week. 

Thursday, April 11, 2024

Tutorial - Fabric Tray, Great for Travel


We like to do a lot of traveling. We do two-week road trips and extra-long weekends. Some of our travels are to visit family while some, like road trips, we stay in hotels. I wanted a little tray that I could put on the dresser in a hotel or guest room that would hold my small items, so they don't get lost. When I travel alone to visit my daughter, I like to take nothing more than a backpack that fits under my airplane seat. I needed a tray that would take up no extra room. This is perfect because it packs flat. It would also be a great gift idea. Even dad would like it if you used fabrics with his favorite sports team or hobby!

If you want a downloadable PDF of this pattern, click HERE

Let's get started on this super speedy project!

You'll need the following: 

10 1/2 inch square of outer fabric

10 1/2 inch square of inner fabric

10 1/2 inch square of med weight fusible interfacing

10 1/2 inch square of fusible fleece interfacing 

*In place of the fusible fleece interfacing, you can use 100% cotton batting and either spray it to one of the fabric pieces with basting spray, or machine baste in place along the edges. 

4 sets of KamSnaps (or you can use sew-in snaps or velcro)

Thread and general sewing supplies

Instructions:

Fuse the fusible fleece interfacing to the back of one of the fabric pieces, and the medium weight fusible interfacing to the back of the other fabric piece. Be sure to follow the manufacturer's instructions for the interfacings you will be using.

On the backside of the fabric with the medium weight interfacing, draw a line 1/4 inch away from the edge on each side. Then take something rounded (I used a large thread spool) to round the corners. Since this is on the interfacing it will not show so you can use a pen or pencil for marking if you want. The red circles show where I rounded the corners.


Place fabric with right sides together and pin to secure. Stitch all the way around your edges, rounding the corners. Stitch on the lines and the curved corners you just drew. Leave a 2-inch opening in the center of one of the edges for turning. Trim at corners to relieve bulk. Turn right side out, gently pushing out the corners, and iron. Fold the excess fabric (at the opening) toward the inside even with the edges and iron. This opening will be closed with the next stitching.

Decide which side you want to be your inside. I'm choosing the travel themed fabric for mine. With this side facing up, stitch all the way around 1/8 away from the edges. This will also seal that opening closed that you used for turning right side out.

Take a ruler and measure 1 3/4 inches away from each edge. Mark with a disappearing marker or a chalk pencil like I am using since the markings can be brushed away. Stitch on that line, all the way from one edge to the other. Do this on each side.

TIP: I like to take a piece of painter’s tape and place it on the bed of my machine and keep the edge of the fabric even with the tape. Perfect stitching every time!

Take a ruler and draw a line from each intersection (where the seams cross each other) to the end of the rounded corner. This will be a 45-degree angle. Use your disappearing marker or chalk for this. Stitch on each of these lines.

You'll need four sets of snaps or some velcro for the final part. Apply them at each corner. The connecting side of the snaps or velcro should be against the inside of the basket. KamSnaps makes this so easy. You'll want your snaps close to the side seams and the outer edges. You'll use one set of snaps at each corner.

That's it! Snap the corners together and you have a little tray. Taking it traveling, just unsnap and it will stow flat in your travel bag.


Don't miss any sewing tutorials, helpful tips, or free embroidery designs! 

Sign up for Sher's Creative News

There's a free machine embroidery design in every issue (unless I'm running a sale). You'll also find links to free sewing tutorials and articles too. The newsletter goes out once a week. 

Monday, April 1, 2024

April Mug Rug of the Month Free Pattern


You can find April design right HERE.

Be sure to download the pdf document to your computer for printing. It's been my experience that the internet pdf viewers are horrible for printing. They also tend to leave out images such as pattern pieces.

You can find all the monthly designs HERE.


Don't miss the next Mug Rug of the Month pattern! 

Sign up for Sher's Creative News

There's a free machine embroidery design in every issue (unless I'm running a sale). You'll also find links to free sewing tutorials and articles too. The newsletter goes out once a week. 

Thursday, February 29, 2024

March Mug Rug of the Month Free Pattern

You can find March design right HERE.

Be sure to download the pdf document to your computer for printing. It's been my experience that the internet pdf viewers are horrible for printing. They also tend to leave out images such as pattern pieces.

You can find all the monthly designs HERE.


Don't miss the next Mug Rug of the Month pattern! 

Sign up for Sher's Creative News

There's a free machine embroidery design in every issue (unless I'm running a sale). You'll also find links to free sewing tutorials and articles too. The newsletter goes out once a week. 

Monday, January 15, 2024

Forever Free - A New Area on My Website!


Did you kow that I just added a new page to the website? I now have a page called "Forever Freebies." That is where you'll find free embroidery designs, free patterns, and I even have some Samsung templates (printables) up there that I created for my own use but am sharing with you. This is not to take the place of the "Weekend Freebies," but to add to it. Stop by and see if you see any projects you'd like to start! Links below:

Forever Freebies

Weekend Freebies


Sign up for Sher's Creative News

There's a free machine embroidery design in every issue (unless I'm running a sale). You'll also find links to free sewing tutorials and articles too. The newsletter goes out once a week. 


Monday, January 1, 2024

January - Mug Rug of the Month Free Pattern!

Several years ago I did a collaboration on another website for a mug rug of the month design. The project was a huge success with only one problem. All the files were stored at Craftsy and they closed down and removed all the designer's shops. It's been a while and I'm still getting contacted by people looking for the pattern so I decided to bring it back. This time though I'm sharing the pattern from my google drive that you can download right here on the blog. It will be published the first week of the month.

CLICK HERE for the January pattern.

Be sure to download the pdf document to your computer for printing. It's been my experience that the internet pdf viewers are horrible for printing. They also tend to leave out images such as pattern pieces.


Don't miss the next Mug Rug of the Month pattern! 

Sign up for Sher's Creative News

There's a free machine embroidery design in every issue (unless I'm running a sale). You'll also find links to free sewing tutorials and articles too. The newsletter goes out once a week. 

Monday, September 18, 2023

New Video Posted - Cellphone Bag for 5x7 Inch Hoop

A new video has been posted at the YouTube channel! Step by step instructions to make the cellphone holder with your 5x7 inch hoop. You can check it out HERE.

If you are looking for the bag design, you can find it HERE.

Do you like free embroidery designs and tutorials?

Be sure to sign up for the weekly newsletter to get a free design every weekend (unless I'm running a sale). Sign up for Sher's Creative News

Wednesday, June 21, 2023

Blog Tutorial - Tablet Sleeve with Pocket


When I travel I like to take my tablet with me, or if I know I'll be waiting for an appointment I'll grab it as well. This way I can get some work done. Sometimes I take my little keyboard, and sometimes I don't. But I always seem to have papers, so it was important for me to include a pocket that will not only hold these items, but is also secure. I came up with this one and it works perfectly! I'm going to show you how simple it is to make yours, custom to your tablet or device. It's a perfect fit and not too snug.


Supplies

100% cotton fabric for outside, pocket, and flap

100% cotton fabric for sleeve lining and pocket lining

Fusible fleece interfacing

Medium weight fusible interfacing

Amounts for the above supplies will depend on how large your tablet or device is. My dimensions are for the Samsung Galaxy Tab 6 Lite


KamSnaps were used for my tablet, but you can use any type of closure you want

Thread to match fabric

General sewing supplies will also be needed such as pins, needles, cutting tools, marking pens, sewing machine, and iron.


Preparations

Measure the width of your device, plus the depth. Mine measured 7 1/8 inches, so I rounded it up to 7 1/4inches. Next, measure the length plus the depth. Mine measured 10 1/4 inches. If you want your case/sleeve to fit perfectly, it's important to take accurate measurements and keep your seam allowances as directed in the instructions.

  
If you keep your device in a protective case, be sure to have it on when taking your measurements. You can use this sleeve without the protective case if you choose, but I personally like the protective case on mine even when it’s inside the fabric sleeve. The case makes it easy for me to use it at a slant on a table if I need to.

Using the measurements that you took of your device, you are going to add 1 1/2 inches to the width, and 1 1/4 inches to the length. 

Since my tablet measured 7 1/4 x 10 1/4, my fabric cuts for the outer sleeve and lining will be 8 3/4 x 11 1/2 inches. This additional amount will be for the seams and the excess bulk.


Cut the fabric as follows

From the new measurements above, cut out 2 outside pieces, 2 lining pieces, and 2 pieces of fusible fleece interfacing. These will all be the same size. For my Samsung tablet, they will all measure 8 3/4 x 11 1/2 inches. Use the measurements you took for your device.

For the pocket, you will cut a piece of outer fabric, and medium weight fusible interfacing the same width that you cut for your sleeve, but an inch shorter for the length. For the pocket lining, you will cut it the same size as your outer sleeve pieces from your lining fabric.

Once you have decided how large you want your flap, you will cut that size from outer fabric (two pieces) and fusible interfacing. Be sure to take into account the 1/2 inch seam allowance all the way around. I wanted to make sure that mine was long enough to close over the pocket to keep papers or other items from slipping out.

NOTE If you only have lightweight fusible interfacing, you can double up on it. That was my case so that’s what I did.

Assembling your sleeve

Fuse the fusible fleece to the backside of each outer tablet piece. Fuse the medium weight fusible interfacing to the backside of the flap, and the other piece to the backside of the outer pocket fabric.

Be sure to follow manufacturer's instructions for the fusible products you are using.

Place the outer pocket piece and the lining pocket pieces right side together. Your lining fabric will be an inch longer. That’s the way it’s supposed to be. Run a row of stitching along the upper edge of your pocket, stitching the two pieces together 1/2 inch from the raw edge.

Place these pieces on the ironing board with the lining side facing you. Pull the lining up and iron the seam just like that. Then flip the lining over to the backside of the pocket and iron in place. This will create a mock binding. Pin to secure. Stitch along the “binding” close to the edge near the seam. Stitch a row of basting stitches down each side about 3/8 inches away from the edges. You will have a little excess at the bottom of the pocket where the lining and the outer pocket doesn’t meet up evenly. Just cut the excess away so they are the same length.

Place this pocket piece on the right side of one of your outer fabric pieces so that the side with the mock binding is facing up. Line up all the side edges and the bottom edges. Machine baste around these three edges 3/8 inch from the edges. Set aside for now.


Create your flap by placing the two small flap pieces of fabric with right sides together. Using a pen, pencil, or marking tool, draw lines where your seams will be, which is 1/2 inch away from the edges. I like my corners rounded so I just grabbed a votive candle that was nearby and used it to make my curves. I drew my lines on the piece with the interfacing so it would be easy to see during stitching.

Stitch the flap pieces together by stitching on the lines you just drew. Leave the upper (straight) edge unstitched. By stitching on the lines, this will make your curves much neater. Trim seam allowances and clip curves. Turn right side out an iron. Stitch about 1/4 inch away from the edges to give it a finished look.


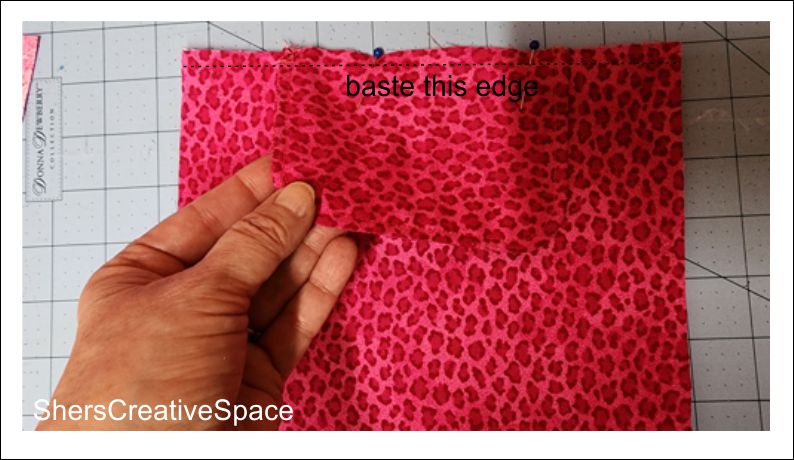
Place the flap on the upper edge of your outer sleeve piece with the outer edge of the sleeve piece against the flap. This will be stitched to the side that the pocket is not on. Be sure to center it along that upper edge and baste in place about 3/8 inches away from the edges.

Place the two outer pieces together with right sides together and secure with clips or pins. Stitch around the sides and bottom using a 1/2 inch seam allowance, leaving the upper edge open. Trim away excess seam allowance and clip corners. Turn right side out and press.

Stitch your lining pieces along the sides and bottom, with right sides together, using a 1/2 inch seam allowance. You will leave the upper edge open. It's also important to leave about a 2 to 3 inch opening in the center of the bottom for turning right side out when you are finished. Cut away excess seam allowance and clip corners. Do NOT turn right side out.

Slip the outer part of the sleeve inside the lining piece. The right sides of the sleeve outer fabric and sleeve lining fabric will be facing each other, and the upper edges will line up with each other. Pin along the upper edges to hold in place for now.

Stitch all around the upper edge using the 1/2 inch seam allowance. I like to go around twice, but you don’t have to. Cut away the excess seam allowance about 1/4 inch from the seam.

Turn right side out through the opening in the bottom of the lining, then stitch the opening in the lining closed. Place the lining inside the case/sleeve and smooth out. Press. Top stitch along about 1/4 inch away from the upper edge.

Place your device inside the sleeve and mark where you’ll be placing your snaps. Finish by attaching the snaps to the pocket and the flap.

NOTE: If you don’t use a case for your device, place it inside the sleeve with the glass screen side facing the back. That way you don’t have to worry about pressing too hard to close your snaps.


Do you like free embroidery designs and tutorials?

Be sure to sign up for the weekly newsletter to get a free design every weekend (unless I'm running a sale). Sign up for Sher's Creative News

Tuesday, February 21, 2023

Designing Back In The Day


Long before PDF patterns and in the hoop embroidery designs there was Craft Magazine among many others. There were also so many hard cover craft and sewing books. It was so hard to get your designs published. You had no control over where your designs were used or seen. Once you submitted a design for publication, if you were accepted and hired, you usually signed away all rights.

One thing that was definitely different was the publication schedule. You'd submit your design in February or March, then if it was accepted, it would appear in their November or December issue. You also had to wait that long for your payment. It was fun and I was a regular designer for some of the publications but these days, it's so much easier for us designers. With that said, the competition wasn't as fierce as it is today. Today anyone can sell their designs and even their finished items. The internet has completely changed the sewing, embroidery, and craft design industry.

You want to know the worst part of it all? Back in 1993 when my first design was published in a magazine, I had to type the instructions on a typewriter! Can you imagine that? No backspace or delete button to be found. It would take me a week to get my instructions just right. Plus, different publishing companies had different requirements. One would want everything typed up with a two inch margin on the left and all pattern images had to be made with a technical pen while others wanted double spaced and wanted your pattern writing to be with a special blue pencil that didn't show up on copiers. I wonder if today's copiers could read that blue pencil?

I was so excited to get that first pattern published! Then when I saw it was on the cover, I was over the moon with excitement! I don't know if you can read the price on the image, but it was $3.95 back then. That's a lot of patterns for $3.95.

I'm sharing some links below about the pencil and technical pens so you can see what I'm talking about. Some of you might know already but the younger readers may not have heard about some of them. I didn't even know what a non-photo blue pencil or technical pen was until I was told to use them. I also want to mention that I dreaded using that pen. I had to use it for one of the publishing companies and it had to be filled with ink. I always made such a mess filling the pen!

https://margretputspentopaper.wordpress.com/2019/02/24/non-photo-non-reproducing-pencils

https://en.wikipedia.org/wiki/Technical_pen


Related Posts Plugin for WordPress, Blogger...