Friday, January 17, 2014

Project 365 - Week 2


Project 365 - One photo a day for a year. Kind of like a photographic journal of my year!

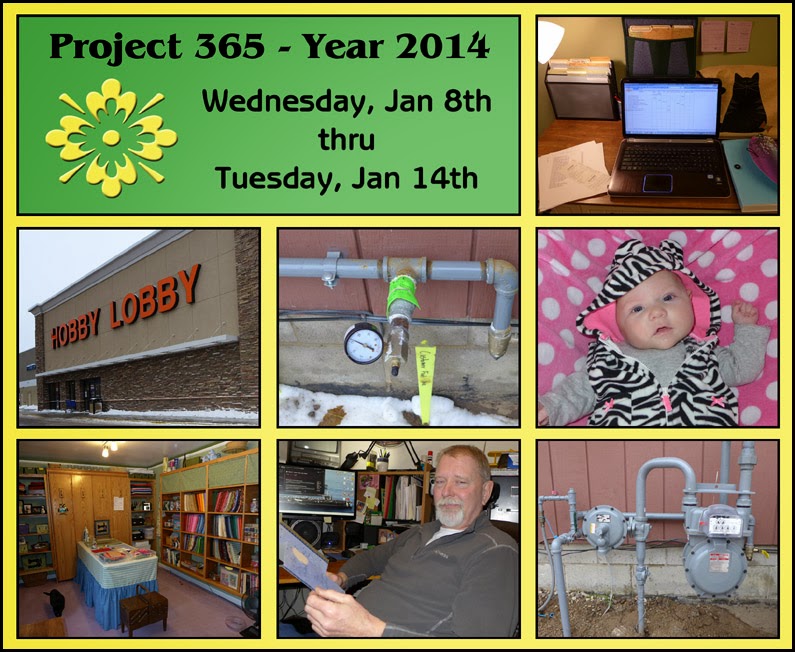
Day 8 - Working on the books, I hate it but it has to be done. The dreaded part of owning a business!

Day 9 - My first day out after the storm. Where do I head? Fabric shopping again!

Day 10 - Stood up by our electric company AGAIN! I think this is the fourth or fifth time. They sure do have a lot of excuses, quite creative too!

Day 11 - The highlight of my week, and the light of my life, a visit with my grand-baby!

Day 12 - Was photographing my studio for a recent blog post. I love my studio!

Day 13 - Brian opening up his cards on his birthday.

Day 14 -  Look! Our new meter has been installed!

One of the things I'm going to place my efforts during this photographic journey is on trying all the buttons, slides, settings on my camera. I'm sure I'll take much better pictures once I get to know my camera a little better.

For more of my Project 365 - Click HERE

Monday, January 13, 2014

Tour My Sewing Studio


For my friends and readers who have been with me for a while, saw my studio photos about a year ago, however, there have been some changes, additions, and new organizational methods since then. My studio started out as a guest bedroom, and it still can be because there is a Murphy bed cleverly tucked into the shelving unit directly behind my project table. The room can be turned into the guest room in about ten minutes. Now when my daughter comes to visit, she has a comfy room to sleep in! I love the fabric storage. As you can see in the photo above, my wonderful and talented husband created two complete walls of built-in shelving. I told him how high I needed the shelving to accommodate my fabric and supplies, and we drew up the plans. Not long after the studio was complete, we added new lighting. The room could not possibly be any brighter!


In this photo you can see the wall opposite the shelving units. I love to use my file folder wall hanging to store patterns in the various stages of design, as well as patterns in line from other designers that I plan to make soon for gifts, or for myself. The curtains were the first things I made for the room. I wanted them to really fit into a sewing studio, so I attached the valance to the curtains with great, big buttons. Love the look, especially since the deer like to hang out under my crab apple tree that is right outside that window.


I love this desk! When it's not being used for sewing, it's a perfect place to work on my books, my graphics programs, or creating my patterns. I love the way there is space underneath to store the containers that hold my smaller scrap fabrics.


The final wall doesn't have a lot of storage space, but it is the wall that leads to the big walk-in closet so it does have it's storage purpose. It has just enough wall space to keep my glass door cabinet. I bought this cabinet about twenty years ago and during that time it has served many purposes, but this is the best so far. I'll be able to store lots more larger fabric scraps. I'm thinking about adding another shelf inside.


Since my window is on the north wall it really doesn't get a lot of sunlight shining through. That makes the adjacent wall just perfect for open fabric storage. I use the comic book backing boards (purchased at Amazon.com) to wrap the fabric around. I love that it's all there in plain sight. The felt squares and felt by the yard are stored flat on the other wall of shelves.


My work table is simply a nice and sturdy six foot, collapsible party table. I glued some velcro to the edges to attach the skirt. Since it wasn't really a good height to work at, I purchased some bed risers from a local store and put one under each leg. Perfect height, and you never see it with the skirt covering it. The best part of this table is that I can take it down quickly when I want to pull the bed down, and it just stores underneath.

MY FAVORITE STORAGE SOLUTIONS:


I think I paid twelve bucks for this over the door shoe storage pocket hanger. It holds all my ribbon beautifully. I've also known people to use these for storing items in their bathrooms. What a fabulous invention!


These clear containers can be found in the scrapbooking department. I got lucky because they were on sale for 50% off when I found them. They are actually for scrapbooking paper but I found them perfect for my smaller fabric scraps, felt scraps, and for storing my 12 inch mini quilts. Look at how they fit nicely under my desk.


Glass jars are perfect for storing pretty and colorful items like zippers, beads, embroidery floss, and buttons! I think they make a big creative statement in my studio!


There is also the obvious storage containers like the thread boxes, baskets, big mugs, and yes, little flowerpots.


Above is my favorite way to store things! I've used these zipper bags for years and it works beautifully. I have these bags in all sizes. It's how I store my notions, beads, embroidery floss, snaps, even acrylic paints. It's just a great system because you can see everything at a glance and you don't have to be neat! It just works! You just throw all the bags in a box, and sort through them until you find what you need. Back before I had my own studio, I stored almost everything, other than fabric, this way. I used drawers, wicker baskets, covered boxes, canvas boxes, and I knew where everything was. The best part, my living room, dining room and bedroom didn't look like a bunch of craft storage. I just hate clutter!


Every studio needs a trusty assistant, and here is mine, Punkie! She's been with me for a long time. I just love Punkie!


My studio always seems to be a work in progress. I hope you have enjoyed the tour and got some new storage ideas for your own space!

Friday, January 10, 2014

A Labor of Love


Everyone who either knows me, or reads my blog knows that I am of a creative nature. OK, so I take it to the extreme! But what many of you don't know is that my husband is an extremely talented woodworker. He doesn't do it for money, he just enjoys making things for the people he loves. In an upcoming post I'll show you several other things he has made for our family, but this one deserves a spot all it's own!

This was one of my Christmas gifts this year. I don't know when he first started working on it, but it's been sitting in the back room since I moved in here over five years ago. I thought it was so pretty and suggested that we hang it up. Oh no, it wasn't wall worthy yet! So there is sat, for a couple more years. Since the cut work was done on a scroll saw, the edges were flat, sharp, and boring. He decided to pick it up one day and start sanding, and sanding, and more sanding until all the edges in all the cutouts were smooth and rounded like you see in the picture. Then he decided it would be so much prettier with a candle displayed on it, so we drew up a template and he took it to a local glass cutter and had the little candle shelf made. Before he gave it to me he coated it with a polyurethane, and look at it now! I LOVE, LOVE, LOVE it!

Tuesday, January 7, 2014

Project 365 - Week 1


Project 365 - One photo a day for a year. Kind of like a photographic journal of my year!

Day 1 - January greeted us with a significant snowfall. Which actually increased multiple times a few days later!

Day 2 - Every year I forget to put something away at Christmas and find it several days later. This was what I left behind this year. Am I the only one that does this?

Day 3 - My first fabric shopping outing of the year, twenty eight yards total! But it was a crazy sale and all the Christmas fabric was 70% off. I HAD to buy it!

Day 4 - Chicken enchiladas! The first home cooked meal I made this year. OK, so I don't cook much. But on the bright side, I married a man who does!

Day 5 - Made some dining room valances. What a difference they make!

Day 6 - Designed a new mug rug. So far, I think this is my favorite!

Day 7 -  Frozen spider webs. Snowbound for three days, wind chills bring temps to 40 - 50 below zero. 

For more of my Project 365 - Click HERE

Monday, January 6, 2014

State of Emergency!


It takes a lot for them to call a State of Emergency where we live. When you live this close to Lake Michigan, the amount of snow that paralyzes most parts of the country, is just the norm for our winter, and when you live in the snow belt, you just hop in your 4Wheel drive and go! 

When you add lots of snow with wind chills of 50 below zero, and heavy winds, you are pretty much snowbound! That is what our past two days have been like. We are right now at the point where all the highways are closed and the rest of the roads are impassable. All that is allowed out in the entire Northwest Indiana area are emergency vehicles and the street department. But then, why go out if you are just going to get stuck in the middle of the road? Yes, that's the middle of the road, not even a ditch. The roads have been drifting over as fast as they can clean them.

So for today, we will be staying inside where it is warm and dry. But then again, we have no choice! Stay safe everyone.

The snowman in the graphic above is from the "Holiday Time" clipart set, and is also used as appliques for mug rugs and mini quilts in the pattern shops. You can find the links to the shops in our sidebar.

Friday, January 3, 2014

Tutorial - Candle Cozy

candle cozy, candle cozy tutorial, scrap buster, scrap buster tutorial, sewing tutorial, free sewing pattern, blog tutorial, free tutorial

This project is so easy and quick to make that you can make up one in less than an hour, or a whole bunch of them in an afternoon. Add ribbons, bows, appliques, buttons, fabric flowers, binding, anything you want to add your own personal and or festive touch! I went a little crazy and made them for all the holidays and every room in the house! I can't take full credit for this smart idea since they've been around for a while. I saw some really cute ones on my friend Duke's Ann's blog recently and loved the idea so much that I thought I'd make some for myself. While I'm at it, why not share the process with you!

Supplies to make one cozy:
Jar candle
Scraps of fabric
Scrap of batting or fleece (cotton batting was used in the samples)
Sewing thread to match fabric
4 to 5” piece of narrow elastic, elastic cording, or a ponytail holder
Large button

General supplies:
Scissors, pins, sewing needles, fabric marking chalk, pen or pencil, iron & ironing board, sewing machine, cutting mat with ruler & rotary cutter (optional), general sewing supplies

Important tips & general instructions:
**Read tips and instructions thoroughly before beginning.

**Iron your fabrics before starting.

**Be sure to secure the beginning and the ending or your stitching with a couple of back stitches to secure your seams.

Instructions:
1.  Measure around your candle and round up to the next quarter inch. If you want an overlap, you can add another inch. My candle is between 10 1/2 and 10 3/4 inches, so I’ll round up to 10 3/4 inches. (Image 1)

2.  Now measure how high you want your cozy. I like to see a little of the jar light, and I want the bottom of it to touch the table, so I’m thinking 3 1/4 inches will be a nice height. Basically, I want to cover the ugly label. This is the best smelling, and best burning candle (best price too), but the label is quite ugly. You also want to remember that you don't want your fabric too close to the upper edge of the candle jar, for this can become a fire hazard. (Image 2)


candle cozy, candle cozy tutorial, scrap buster, scrap buster tutorial, sewing tutorial, free sewing pattern, blog tutorial, free tutorial

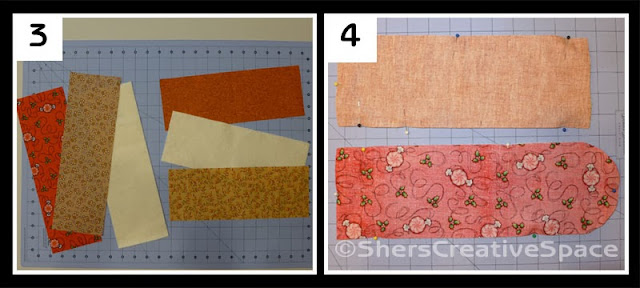
3.  Take those measurements and add 1 inch to each. This is to allow for your 1/2 inch seam allowance. Since my finished cozy will be 10 3/4 inches by 3 1/4 inches, I will cut my fabric (outside and lining), and my batting to 11 3/4 inches by 4 1/4 inches. (Image 3)

NOTE: I also made some where I allowed an overlap and I rounded the corners of one of the short ends. I just really liked how this looked. If you plan to do this, you can add an additional 1 1/2 inches to the measurement of the longest edge, plus the one inch for the seam allowance.

4.  Lay your batting piece on the table. Place the fabric piece that will be facing out on top of the batting with the right side facing up. Lay the lining piece on top of this with the wrong side facing up. Make sure all three pieces are stacked evenly and neatly. Pin or clip to secure. (Image 4)


candle cozy, candle cozy tutorial, scrap buster, scrap buster tutorial, sewing tutorial, free sewing pattern, blog tutorial, free tutorial

If you have added the additional inch and a half for the overlap and you want it rounded, just find something to trace around to get the roundness that you desire. I used a candle cup for mine. You are only going to do this on one end. Cut on the curved lines.

5.  In the center of one of the long edges, mark off about a 2 inch section. If your fabric is a one way design, make sure to make this at what will be the bottom of your cozy. This is where you will leave the opening to turn the cozy right side out after stitching. (Image 5)

6.  Form your elastic piece in half, forming a loop. Slip this through the center of one of your ends with the loop toward the inside of the fabric, and the ends sticking out about a quarter inch. If you made one of your edges rounded or curved, this is the end where you will place the elastic. Pin to secure in place. (Image 6)


candle cozy, candle cozy tutorial, scrap buster, scrap buster tutorial, sewing tutorial, free sewing pattern, blog tutorial, free tutorial

7.  Using no more than a 1/2 inch seam allowance, pivoting at each corner, stitch around the entire piece but make sure to begin and end your stitching at the 2 inch marked off area. You will need this opening to turn right side out. Run a few back stitches at the beginning and ending of your stitching. You can also run a little row of stitching next to your first row where you inserted the elastic for extra security. Just make sure that your second row of stitching is in the seam allowance and not on the other side of the first row of stitching.

8.  Trim away about 1/4 inch of the seam allowance, then trim each corner at an angle, making sure not to cut into the stitching. Turn right side out, pushing out corners and iron. Fold the excess fabric at the opening to the inside even with the edge of the cozy. Pin to secure. (Image 7)


Top stitch all the way around the cozy about 1/8 inch away from the edge, pivoting at each corner.

9.  Wrap cozy around candle and mark with an “X” just inside your loop. Stitch button on the center of that “X.” (Image 8)


candle cozy, candle cozy tutorial, scrap buster, scrap buster tutorial, sewing tutorial, free sewing pattern, blog tutorial, free tutorial

Wrap cozy around candle and place the loop over the button.


Do you like free embroidery designs and tutorials?

Be sure to sign up for the weekly newsletter to get a free design every weekend (unless I'm running a sale). Sign up for Sher's Creative News


Thursday, January 2, 2014

Freebie - Etsy Digital Designers Team Calendar!


I just love being a part of the Etsy Digital Designers Team! We are always busy working on projects for our friends and followers. All year long you can go to their website and download your free monthly calendar page. Each month you will have three to choose from. They are all so cute, it's hard to make a decision! Can't decide which one to print, why not print out one for each room in your house? You can pick up your calendar HERE.

Also, keep a lookout for another Facebook Hop in just a few weeks. This one is all about LOVE! Yes, a Valentine's Facebook Hop is in the works. For those not familiar with the hops, this simply means that you will go from page to page and collect lots and lots of freebies! It will be announced here when the time comes.

Want to make sure that you don't miss any of our facebook hops, or Sher's freebies, tutorials, exclusive discounts, and helpful articles. Be sure to sign up for our VIP Club for notifications of all that, plus other fun things!

Tuesday, December 31, 2013

Happy New Year!


The years are going by so quickly. It seems like just yesterday I was sitting here writing my goals (not resolutions) for 2013. That year has come and gone and although I still have a lot of work on my personal goals, I accomplished my business goals, even beyond my wildest expectations!

Some of the highlights for last year were my trip to Delaware when I attended my daughters graduation from grad school. We crammed so many adventures into those five days, including a trip to Atlantic City were I actually won $7 on a slot machine! Later that summer my daughter and her husband stopped by here for a few days (with the kitties) on their way to their new home in Austin, Texas. My beautiful niece got married this year also. And look at the center of the grouping where you will see that sweet little baby, that is my first grandchild, Paige. She was born in October of this year. And last but not least, this is the year where my business has grown to the point where I was able to quit my job and focus full time on my new career as a business woman, designer, and author!

As you can see, it's been an awesome year, and it's going to be difficult to top. For now I will focus on the goals I have set for 2014, and work hard at achieving them. What are the goals that will affect you? Besides creating more patterns and graphics for my shops, you can look forward to lots more free graphic items as well as more blog tutorials. Some are actually in the final stages of completion right now!

One of my patterns will be out in a book by F+W Media soon. The book is packed with lots of fun scrap projects. They will be giving me several complimentary copies so it looks like I'll be hosting a giveaway when it arrives.

Bring on 2014!

Friday, December 27, 2013

Bells and Whistles


As I was putting my wine glasses into the oven for my Painted Snowman Wine Glass Tutorial, I noticed a button on my oven that said BAKE TIME. I've never used it but I thought I'd see if it would shut my oven off after my 30 minutes of baking. And guess what? It did! As I was looking at the other buttons I noticed the usual CLEAN (the oven cleans itself), but I noticed another one that said SLOW COOK. Wow! I actually can't wait to try that one, and does this mean that I didn't have to go out and buy the crockpot a few weeks ago when mine broke?

This got me thinking about all the other things I have in my house that I can do so much more with if only I'd read the manuals or start experimenting. Quite recently Brian asked me if I knew my entire graphics program (Corel Draw) and I said, "Heck No! I'm learning more and more things as I go along." And to think that I've been using that program for over 12 years! Perhaps I should get out that one inch thick book that came with my most recent upgrade. And how about all those programs that came pre-installed on your computer? Maybe it's time to start exploring!

I recently got a camera which I love, love, love! It takes the best pictures of any digital camera I've ever had. It even has all the lens settings and adjustments which I know NOTHING about! I think it's time to learn and see what this thing can do!

I just recently started experimenting with all the stitches on my sewing machines and have found some new favorites. I've even started learning free motion quilting. I think next it's time to play with all those feet that I have never tried. This could take my creating to a whole new level.

The same can be said for cookbooks, especially those unusual ones. I just recently came across a cookbook that Brian and I bought during a visit to Bass Pro Shops. It's a cookbook on cast iron skillet cooking. It's full of unusual and unexpected recipes that I've never thought of. Now that I have more time since leaving my "day" job, I'll have more time to create some new meals, perhaps some cast iron skillet meals!

So if you got a new sewing machine, tablet, computer program, camera, or awesome and unusual cooking device, get out that manual and see what you can really do with it. Better yet, experiment with the stuff you already have, and it might just be like you did get something new!

Monday, December 23, 2013

Merry Christmas!


The blog will be silent for a few days while I along with many others will be busy with holidays. My daughter will be arriving today and she will only be here for two days so I plan to spend every waking and breathing moment I can with her. It will also be the first Christmas with my first grandchild. What an exciting Christmas this will be!

I wish all my readers and friends out there a Merry Christmas and I'll see you in a few days!
Related Posts Plugin for WordPress, Blogger...