Saturday, October 22, 2016

Always Looking for Fresh and New Ideas!


I figure I have around 200 mug rug patterns in my shops. Many of you don't know this, but some of them were designed for my customers who were looking for something special. Every now and then I get an email with a request for a certain mug rug design. I do my best to come up with exactly what they want. They are always thrilled with the results.

Do YOU have anything special you'd like to see in a mug rug design? If so, then send an email to sheryl@sherscreativespace.com and I'd love to take a look at it! And remember, the appliques used for the mug rugs can be used on numerous other projects!

And did I mention that there is a bonus in it for you if I use your idea? Yep! There sure is!

To see my already huge selection of mug rugs, stop by Sher's Creative Space.

Thursday, September 22, 2016

Tutorials - Earbud Round-up!


Back in the day, it wouldn’t be uncommon to see a teenager walking down the street with a cord hanging from their ears to some kind of musical device. Technology has certainly changed things. Now I’m seeing more and more women and men (my age and older) walking past my house, waiting for a bus, and even strolling through the grocery store with that same cord connected to their ears! 

Now that most people have smartphones they can be listening to everything from music, to podcasts, to audio books. Yesterday I was in WalMart and an older woman, probably in her 70’s was listening to something with her earbuds. I was so tempted to ask her what she was listening to, but I didn’t.

I carry my earbuds in a little zipper case that I made (last tutorial down) in my purse, which keeps them nice and tangle free. Here is a nice little round-up of some very different, fun, and free tutorials to keep your earbuds neat and tidy.  

Here’s a cute one that has been knitted.
http://www.hugsforyourhead.com/2014/09/earbud-pouch-free-knitting-pattern.html

I love the fun shape of this one!
http://tizzycrafts.blogspot.co.uk/2012/05/earbud-case-tutorial.html

Do you like to work with leather? These look pretty simple and cute.
http://www.designertrapped.com/diy-earbud-holder/

How about this folded flower. I love the use of the KamSnaps with this one.
http://sueoverydesigns.com/blog/earbud-case-ith/

Are you not a fan of sewing? How about these cute cases made from mint holders!
http://www.makeit-loveit.com/2015/05/make-an-earphone-holder-from-a-mint-container.html

This one is too cute for words. It’s a felt owl. The tutorial calls for wool felt, but I would use my plain old acrylic. I think it would be just as cute.
http://empressofdirt.net/diy-ear-bud-case/

This cute floral earbud case doubles as a business card holder too!
http://www.polkadotchair.com/2016/01/diy-earbuds-case.html/2/

Don’t forget mine! This is one of my older tutorials, but still useful! It can hold other things such as sweetener packets and even coins.
http://sherscreativespace.blogspot.com/2015/09/scrap-buster-earbud-case-or-tiny-coin.html

So what do you listen to when you have that cord hanging from your ears?


For one week only you can get the pattern for this trick or treat bag duo for only $2.75! After Halloween, the kids will have a cute totebag to pack up for a weekend at Nanas! You can find this deal right HERE. Offer expires September 29th.

Friday, September 16, 2016

Sewing for a Cause 2016


It’s that time of year again when people are thinking about the upcoming holidays and the hustle and bustle begins! It’s also the time when people think that it’s time to give back. In the photo above is a bunch of small wallets that I’m stitching up to donate to our local animal rescue group so they can use them for their holiday fundraisers. This year I’m also going to do the Case for Smiles project (link below) where I’ll be making some fun and colorful pillowcases for children in a hospital.

If you aren’t sure where to begin, here are a few links to get you inspired:

Hey bag makers! Here’s a place where you can make purses for girls in school:
http://sewpowerful.org/ 

Here is one of my favorites which I will be participating in this year. You can make some quick and easy pillowcases that will be given to kids with cancer. Make sure they are fun and colorful!
http://caseforsmiles.org/ 

Here’s one for adults and children. Make some chemotherapy turbans.
http://www.sewing.org/html/turban.html 

How about making a blanket for a child in need? Give them a little extra comfort that they so desperately need.
http://www.projectlinus.org/about/

Since many of you know, our furry little friends are very near and dear to my heart, make up some simple beds that they can snuggle on while in the shelter and waiting for their forever homes.
http://kennelcomforters.blogspot.com/ 

Still haven’t found one that tickles you fancy? Here is a whole list of them!
http://www.sewingpartsonline.com/blog/sew-for-charity.aspx 

Do you prefer to support your local charities? Call your local humane societies, churches, women’s shelters, and hospitals to see where help is needed. Many of them do fundraisers throughout the year, while some of them will take any items that someone will find helpful. How about stopping by your local assisted living places or nursing homes, and see if someone could use a walker caddy or another personal item. Not everyone there is lucky enough to have family visit so their needs go unnoticed. You can even start your own!

Whether you sew for charity, shovel your elderly neighbor's driveway, or volunteer your time where needed, one thing is for sure, it will make your heart feel good! That's what I call a Win/Win!

Saturday, August 20, 2016

Super Quick and Easy Luggage Tag Tutorial


Don’t you just love this bag? It’s a pattern from Two Pretty Poppets. It’s actually a beach tote but it fits my needs for a perfect weekender travel bag. Just one thing missing......a luggage tag!

These tags are seriously so quick and easy to throw together. To make your own, you can dig into your scrap pile because it really doesn’t take much. I used a fairly light weight plastic for the window but you can leave it open if you want, just be sure to make your information card larger than the opening. You can also skip the window and just make a plane pocket. I like the window because it’s a perfect fit for a business card. As for the plastic, it’s not expensive. I got mine from the remnant bin at JoAnn Fabrics.

To make your own you are going to need:

Fabric as follows:
(1) 2 x 12 inches for the strap
(2) 3 1/2 x 5 1/2 inches for the backing
(2) 3 1/2 x 5 inches for the pocket
(2) 3 1/2 x 5 1/2 inches for the flap

Interfacing as follows:
(2) 3 1/2 x 5 1/2 inches for flap and backing
(1) 3 1/2 x 5 inches for the pocket
(1) 2 x 12 inches for strap

You will also need:
(1) 3 1/2 x 5 inch piece of plastic (optional)
(1) KAM Snap set (size 20), or a sew-on snap (8 or 10 mm)
Thread to match fabric
General sewing supplies


Important notes:
**You will be using a 1/4 inch seam allowance for all stitching. Make sure that you do not go under that amount, in fact, it’s OK if you go just a smidge over.

**Fabrics can match, contrast, or you can use the same for all the pieces.

**Avoid touching the plastic with your iron. It could melt. Also, when pinning the pieces together, make sure not to poke the pins into any part of the plastic that will show (such as the window).

**Don’t make your stitches too small because you could actually perforate your plastic and it could tear during use.

**If pre-washing fabrics, do NOT use fabric softener. It can prevent you fusible adhesive from sticking.

Let’s begin:
1.  Fuse the interfacing to the backs of the corresponding fabrics. You will have a piece of interfacing for each of the four sets (backing, pocket, flap, and strap).

2.  With right sides together, pin the sets together. There will only be one fabric piece for the strap. Make sure all your edges line up evenly and round your corners. I used a quarter. Do not round the corners of the strap piece.


3.  Take the window pieces (3 1/2 x 5 inch piece), that are still right sides together, and lay them on your work surface with the interfacing side facing up. Draw a line 3/4 inch down from each edge. This will create your window.


NOTE: In my sample photo, you can see my pen lines extending past the corners, just don't stitch past the corners on those lines. Just stitch the square.

4.  Stitch on those lines pivoting at the corners. Remove from machine and draw diagonal lines from corner to corner creating an “X.” Cut on the lines. Clip as close to the corners as you can without snipping through your threads.


5.  Trim the excess inner fabric (that was once the X) down to 1/4 inch away from the seam.


6.  Turn this piece right side out by pushing one of the layers of fabric through the window just as if you were making a zipper opening in a garment. Be sure all the raw edges line up perfectly an iron well. Baste 1/8 inch away from the outer edges to hold. Be sure to use your large basting stitch because you will be removing some of the basting stitches later.


7.  Decide which side you want showing and place the window with this side up on top of your plastic. The raw edges of the fabric will line up with the edges of the plastic. Pin or clip to secure. Stitch plastic in place by stitching about 1/8 inch from edge of window opening. Be sure to stitch with the fabric on top of the plastic. Carefully trim away excess plastic about 1/8 inch away from the stitching line. I decided to cut the plastic much bigger than it needed to be to make lining up and stitching easier.


8.  Remove the basting stitches along one of the short edges and down about 3/4 inch on each side. Turn these raw edges to the inside 1/4 inch and iron. Stitch close to the folds to create the top edge of your pocket. Remember to be careful with the iron and the plastic.


9.  Place this piece on top of one of your backing fabric pieces (the one that has the interfacing fused to the back). Both of these will have their right side facing up. Line them up at the bottom edge. Now place the remaining backing fabric on top of these with the wrong side facing up. Pin or clip to secure.


10. Stitch around the edges. You will begin your stitching just at the beginning of the upper curve, and end your stitching at the same place on the other side. You want a nice opening at the top to turn right side out.


11. Clip curves and turn right side out. Turn the upper edge under 1/4 inch to the inside. Iron. Set aside.


12. Fold your strap piece in half lengthwise with wrong sides together. Fold the remaining two raw edges to meet at the center and fold back in half. You will now have a piece that measures 1/2 inch wide and 12 inches long. Stitch along each long edge close to folds.

13. Fold in half and slip the ends into the opening on the tag backing and pocket you just assembled. They should go in about 1/2 inch. Pin or clip to secure. Top stitch around the entire thing about 1/8 inch from edge.


14. With the right sides together, stitch around the flap pieces beginning and ending your stitching just like you did in step 10 when stitching your backing fabric and your pocket.

15. Clip curves, turn right side, out and iron. Top stitch around outer edges. 

16. Place this on top of your backing/window piece with the right top side of the flap facing up. Stitch near the upper edge about 1/4” down, and stopping and starting your stitching about 1/2 inch away from sides.


17. Attach the snap of your choice, insert business card or other ID, then hang from your travel bag.


Do you like free embroidery designs and tutorials?

Be sure to sign up for the weekly newsletter to get a free design every weekend (unless I'm running a sale). Sign up for Sher's Creative News

Friday, August 12, 2016

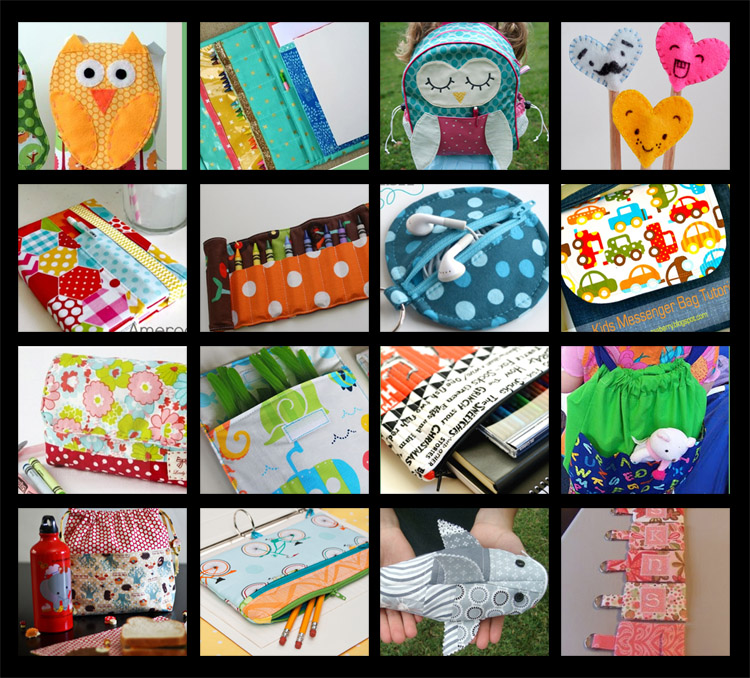
Roundup - 16 Back to School Tutorials


Although it seems like summer couldn’t possibly be close to over, the calendar says otherwise. I’ve put together a roundup of some of my favorite back to school projects. You will find that a few of them aren’t just for kids! You’ll also find that they are all FREE!


The photo image above shows a thumbnail of each tutorial which are in order from left to right.

Friday, July 29, 2016

Christmas in July - Tablescapes


We have come to the end of our Christmas in July Celebration. The month sure did go fast! I’m going to close this subject with a discussion, and by sharing some ideas for tablescapes.

I don’t do a whole lot of entertaining for the holidays but I do have a few dinners or a craft party here and there. Years ago I did themed teas. I had themes such as A Reindeer Tea, A Sweet Shoppe Tea, and A Shopping in the Big City Tea. Those are just a few. Everything matched the theme from the invitations right down to the favors and decorations. They were a blast! We also had delicious food.

One thing that is important to me when having such an event or dinner, is the festive details. I like everything to be perfect, and I want my table to look and feel spectacular! It’s so easy to do this too. Many times you can do this with things you already have around the house. Just let your creative mind take you away! If you need some inspiration, check out the many ideas you can find on Pinterest.

If you are the crafty type, which many of my readers are, you can whip up some cute decorations for your own table. This week’s CRAZY DEAL can even help you with that task. So get inspired to make your dinner or even a fun time that everyone will remember fondly.

Below are a few of the favorites that I found while searching for some cute and festive examples.


Image Source: HERE


Image Source: HERE


Image Source: HERE

Wednesday, July 27, 2016

Busy Little Bird Feature


Every time someone asks if I’d be interested in a blog feature, I’m so very flattered! This time I was approached by Busy Little Bird, so off I went to check this place out. I was wowed (is that a word?) by the colors of felt that actually exist! I never realized how much I limited my creative endeavors by purchasing only from my local shops. And do any of you even know that felt balls existed? I certainly didn’t. I was especially excited to see these!


So, for those who know me and follow my blog or newsletter, know that I only share things I LOVE, and this is one of those shops. Also, those who know me, will know that my wheels are turning in the old noggin to think of some way, or many ways to use some of those felt balls. I do believe that you are going to see a pattern or tutorial down the road that includes them. 

She asked me some great questions and I held nothing back. If you would like to read the article and take a peek into my life and my studio, stop by The Busy Little Bird and read all about it. While you are there, take a look at her shop. I know I have a lot of felt lovers out there and you’re sure to find a great selection.

Friday, July 22, 2016

How to Host an Awesome Craft Party!


Have you ever thought about hosting a craft or sewing party? I’ve hosted a couple, and I’ve been to a couple. They sure are a lot of fun! Most recently I had a glass painting party. We even had my then three year old niece in attendance and she had a blast too. 


Here is how I coordinated mine. We each bought a few bottles of enamel paint. We did make sure we weren’t purchasing doubles. Some bought a couple brushes and some already had some. I had more than enough to share. I made sure I had (which I always do) plenty of disposable plastic cups, paper plates, and napkins. Everyone also brought the glass items they wanted to paint. We actually went to the dollar store and bought martini glasses, wine glasses, candle cups, etc. I even had a stash of baby food jars I stashed away when the granddaughter was here. I also stocked up on wine and snacks for my guests. 


I placed large sheets of rosin paper (nice to have on hand for so many projects) over my dining room table and my kitchen counter top to keep them safe from paint. We had such a good time and we all made some great gifts. They did the baking at home because this particular craft requires you bake the glass in a slow oven for about thirty minutes, but not until the glass has set for forty-eight hours.


We had so much fun at this one, we all had another one at my sister’s house a few weeks later. Why not give it a try? Maybe like us, you’ll be starting a new family tradition!

Friday, July 15, 2016

Deck those Halls! Here Are Some FREE Patterns to Help You!


Christmas in July is still happening! At least at Sher's Creative Space. This week our focus is going to be handmade Christmas decorations and ornaments. I always like to put an ornament on a Christmas gift with the bow. I just think it adds a fun and festive touch. Here some of the free tutorials I have on my blog, but of course you can also find a lot of holiday patterns at my website, Sher's Creative Space.


Here are some fun and festive pillows to put you in the holiday spirit. They are made to slip off and on easily so you can change them out after the holiday is over.


How about decorating your table with this easy quilt as you go runner. You can even make one in colors to match your every day decor.


So popular every year are these lollipop ornaments. They are cute, fun, and no sewing machine required.


Combine some felt and some 3-dimensional paint, and you can have these cute gingerbread ornaments. The paint sure does look like real frosting!


These hobby horse candy cane holders are a re-creation of some ornaments my grandma made for our tree when I was a child. Anyone can make them, no sewing machine required!


They make these flameless candles so realistic now and that's a good thing because that is what goes inside these wineglass lamps. These are as easy as they get! These make perfect gifts for hospital patients, nursing home residents, pre-teens or someone who suffers from allergies. Great for those who shouldn't be around a real flame for any variety of reasons.


How about some cute baby food jar candles! These can also be used for other things as well, such as giving a gift of candy, or even jewelry. I use them in my bathroom at Christmas to hold my cotton balls and Q-tips.

Get busy! Christmas isn't as far away as you might think.


Friday, July 8, 2016

Christmas in July Begins Here - Gift Tutorials!


Welcome to my month long Christmas in July celebration! Christmas is actually several months away but it's never too early to start making gifts. You can find lots of pattern ideas (especially mug rugs, which make great gifts) at my website at Sher's Creative Space. I've also included a list, right here, of gift tutorials you can find right here on the blog!


This travel jewelry bag could not be any easier!


These earbud cases are quick and can be used for so many other things.
Great stocking stuffers!


Make up some carbags or tablet cozies. I hang one on my door knob that I can grab on my way out the door if I need to take extra little things along for the ride.


Tutorial - Kitchen Gift Bags #tutorial #diy #christmas:

Just buy some inexpensive box mixes, rewrite the instructions, and put them in these ultra quick bags. Great for hostess gifts.


A couple years ago I whipped up a bunch of these foldable tote bags. I gave them to my girls and kept some for myself. I'm not a fan of the plastic grocery bags that I see littering the ponds and streets.
Related Posts Plugin for WordPress, Blogger...