Showing posts with label Travel. Show all posts

Thursday, March 5, 2026

A Little Gift for You - A Customizable Packing List for Your Travels

You know how I love to travel! I also like to keep organized. Part of that organization includes making sure I have everything I will need. I created this list to share with you. Think of it like a "base" that you can customize by adding, replacing, or removing things. I like to keep my travel planning in my Trello boards, but I know not everyone uses that platform, so I figured everyone could use Excel. If you don't use Excel, there are other programs you can open the document in, but you can also open it with Google Sheets which is free. Just be sure to save a copy of it so you can edit.

If you'd like to see some travel organization in Trello, just let me know!

You can pick up your free copy of  the packing list by clicking HERE.


Wednesday, October 22, 2025

The Worst Summer of My Life

As the title says, it has been the worst summer of my life! I wish I could start over again, but have it end with different results. My husband and I had been looking forward to a really nice vacation starting with a scenic train ride from Chicago to San Francisco, then spending four days in San Francisco in the beginning of summer. Unfortunately, he became ill, so we flew home. He passed away within 18 hours of getting home. He passed from pneumonia. It all happened so fast! One day he was fine and working in the yard, traveling and enjoying the scenery. In just a couple of days later, he was gone. 

So, my life is in a complete mess right now. It's the absolute worst thing I've ever been through in my life. Fortunately, I have an amazing support system with family and friends. My kids have talked me into moving closer to them, which I agree is a good idea since I do spend so much time with them and I now feel so alone out here by myself. It's really not that far (about 30 minutes) but now I've found a house a mile away from my son. In the summer it's not so bad, but we are known to have some brutal winters with a lot of that Lake Michigan snow. And driving can be disastrous. And it will be so nice to be right there with them. My granddaughter and my son timed their bike ride from their house to mine, five minutes and 15 seconds. My subdivision is across the street from theirs. She is really excited. I've even given her the task of decorating the guest bedroom since she will be the one to use it the most.

This is why the blog has been neglected. Between keeping the business afloat, grieving, moving, and trying to get my life back in some kind of order, I'm overwhelmed. So, hang in there with me and I'll be bringing some more informative articles, tutorials, and other fun things you are used to seeing here. I might just be moving a little slower at it than usual.

Photo above: One of the photos I took from our scenic train ride which was the last time and place I saw my husband's beautiful smile.

Monday, July 7, 2025

Travel Tray Pattern

I seriously can't stop making these! It doesn't get any easier than this. I've seen this little tray all over the internet, so I decided to create a pattern to share with my creative friends. They are so easy and so quick, you can make a bunch of them in no time. I'll bet they would be great sellers for your craft shows or Etsy shop. You can make them in any size you want. 

I made the first one for myself for our travels. They are perfect for setting on the dresser of a hotel or guest room to hold your small items. In my case, my husband kept throwing his pocket full of change into mine. The germs and gritty feeling of money creeps me out. So, I made him a smaller one just for that purpose. Now I can keep mine nice and clean.

I shared the tutorial awhile back but I've turned it into a PDF pattern so you can download it and print it out if you like. Personally, I like to read patterns from my tablet to save on paper and ink. You can find the download right HERE

If you prefer the tutorial on the blog, you can find that HERE

I'm slowly going through all my tutorials, and I'll be turning them into PDF documents. Keep watching either with my weekly mailer or follow this blog.


Sign up for Sher's Creative News so you don't miss anything!

There's a free machine embroidery design in every issue (unless I'm running a sale). You'll also find links to free sewing tutorials and articles too. The newsletter goes out once a week.  

Thursday, June 5, 2025

What Happens on a Girls' Trip...

If you've never gone on a girls trip you are missing out! One of my mom's favorite things was going on girls’ trips. And for those who knew her will know that they were always centered around shopping. Mom loved to shop! Two of my favorites were Mall of America and Gurnee Mills. She always liked to stay in the nicest hotels too. I really miss those days with my mom, my sis and myself just enjoying non-stop shopping and having fun. My most recent was a trip to Frankenmuth with my daughter-in-law, my sis, and our granddaughters. And yes, in the photo above you'll see my 60-year-old sister hanging from the luggage rack. It's hard to believe that no drinking was involved. But that's just some silly fun we would have never had if we had the hubsters along.

What makes for a good girl’s trip? A girl’s trip is anything you want it to be. You can go on shopping trips, state park trips, big city trips, small town trips, and even wineries. For the wineries just make sure you grab an Uber and of course, you must all be twenty-one. And whatever you do, you need to journal it so you never forget a thing. If kids are involved, it's easier when they are older. Just be sure to include as much fun for them as for the adults.

Another fun thing to include is something matchy. If you are the planner, you can give everyone a nice little gift such as fun travel accessories or piece of jewelry. On our recent trip you can see that we all had matching (temporary) tattoos. Quite surprisingly they lasted the whole trip!

OK, one more rule. When you do travel with your granddaughters and they want ice cream for dinner, you have ice cream for dinner!

Where will your next girls’ trip be?


Sign up for Sher's Creative News so you don't miss anything!

There's a free machine embroidery design in every issue (unless I'm running a sale). You'll also find links to free sewing tutorials and articles too. The newsletter goes out once a week.  

Thursday, May 8, 2025

Is This What They Call The Golden Years?

Does time seem to go too fast or is it just me? I have officially reached what they call the “Golden Years.” I celebrated my sixtieth birthday four years ago and in the past four years I feel like I’ve learned so much, mostly about myself. And it’s not all bad. The way I look at things is completely different than it was just ten or fifteen years ago.

I’ve learned where my priorities are. I’ve always put my family first above everything but I now I guess I look at it even differently. I became a Nana almost twelve years ago. I’ve discovered a kind of love that I’ve never known before. Having kids is amazing in its own way, but having a grandchild is on a whole other level. Maybe it’s because you don’t see them as much as you did when your kids were growing up, or maybe it’s because you are not the disciplinarian and are more relaxed and chill around them. I just know that when that beautiful child is with me, life stops everywhere else, and I just enjoy every minute.

Time is ticking along. Some say time is an illusion and I never understood that, and probably never will. The fact is that it’s moving ahead, quickly. All that being said, the way I prefer to spend my time is different than it used to be. I focus on doing things I enjoy, and I have learned to say no to things that I would have done before because I thought I had to. No more of that.

Giving is so much more fun for me than receiving. You reach a point where you really have what you need, and “things” don’t make you as happy as it once did. I find it more rewarding to share what I have or what I can with others that are in need. Time, money, or awareness can make a difference in your life and can help those in need. When you realize how blessed you are, in what ever way that may be, it makes you want to share that with others.

There’s more to life than what we have in Indiana. Yep, a lot more! I’ve always enjoyed traveling but these days, we travel every chance we get. I’d rather spend my money doing things and having experiences than buying material things. It’s a big world out there and we want to see it while we still can. We’ll be taking our first scenic train ride in a couple of months. It will be an experience. I’m glad my husband isn’t into taking pictures and videos because I’m sure it will be quite a sight watching me climb up into the upper bunk at night.

I realize that my health is my most important asset. No truer words have ever been spoken. As I watched my parents and others age, I realize that not only do I want to remain healthy to live longer but I want to keep my mobility. Years ago, diet and exercise were something I attained for vanity purposes. Today, it’s all about my health and mobility. I’ve gotten a good hold of that lately and am working hard at trying to maintain a healthy lifestyle. Next, I’m going to add strength training to my daily routine.

If you are still with me and haven’t fallen asleep while I ramble on, thank you. My final thought is that I hope you are inspired to take good care of yourself and those around you.

The photo above is my favorite photo from a two-week road trip we took last year. There are a lot of beautiful places out there!


Sign up for Sher's Creative News so you don't miss anything!

There's a free machine embroidery design in every issue (unless I'm running a sale). You'll also find links to free sewing tutorials and articles too. The newsletter goes out once a week.  


Tuesday, April 29, 2025

Tutorial - Turn Any Small Toiletry Bag into a Hanging Bag!

I have been on the hunt for the perfect hanging toiletry bag for travel and have not found one. We just scheduled a (2 overnights) trip on the California Zephyr. It's our first rail trip and I've been doing my research. One of the things I've heard over and over again is that you want to hang your toiletries for two reasons. First, you do not want to set it down on the sink because it has been used by so many people before you. Second, there isn't much room anyway. So of course I continued with my search. Found nothing that I liked as much as the ones that I've been using for probably about ten years. I just really love these bags because when I made them, I really took my needs into consideration. Plus, anyone who know me, knows that I travel like a minimalist. I take the least amount possible and pack ultra light. If you'd like to hear more about this technique, drop me an email or comment right here. I have it down to a science now. Checking bags has gotten so expensive and it seems like halfway through boarding they always start gate checking carry-on bags anyway. But I think the thing I like most about packing everything in a personal size backpack is that my stuff will never get lost. It's also nice to have all your stuff with you and it's so much easier to throw it over your shoulder than lugging a suitcase around. I'm in my 60's and I still find it easier! 

NOTE: The bag located at the bottom of the image is a pattern by Andrie Designs which could be found HERE.

I decided to keep my well loved bags and just make an attachment that can turn it into a nice hanging bag. If I'm going somewhere that I don't know how much counter area I'm going to have, I throw a suction cup in my bag so I can hang it from the mirror if needed. But like I said, I take very little with me so if you have a whole lot of toiletries and your bag is heavy, this will not work for you. These seriously took me  minutes to make! If you prefer the PDF version of the pattern, you can click right HERE.

What you'll need to make the tab:

100% cotton fabric, scraps that will match or compliment your toiletry bag

Fusible fleece interfacing, scrap (you can also use a piece of felt or cotton batting in place of fleece)

Dimensions for the above supplies will depend on the size of your toiletry bag

Thread to match fabric

5/8” wide ribbon, 2 1/4 inches long

Long Prong KamSnaps were used for my project, but you can also use velcro or sew-in snaps

Large S-Hook or carabiner clip

General sewing supplies will also be needed such as pins, needles, cutting tools, ruler, marking pens, sewing machine, and iron.

NOTE & TIP: I strongly recommend using the long prong KanSnaps. I purchased mine at Etsy. I tried the regular ones for this project and they kept popping off. I switched to long prong and have no problems. Also, if you are going to make a hanger tab for one of those clear vinyl bags, regular KamSnaps will be fine. To add a little more strength to a vinyl bag, I would cut a narrow strip of medium to heavy weight interfacing or felt. Place this between the snap and the bag.

I feel that five snaps are best because it provides more strength.


Create your pattern piece (or use the one that is with the PDF instructions linked above and below).

If designing your own tab, remember that you will also be using a 1/4 inch seam allowance all the way around.

From your pattern piece, cut two from the cotton fabric, and one from the fusible fleece interfacing. Iron the fusible fleece interfacing to one of the backs of the fabric pieces. Be sure to follow the manufacturer’s instructions for the fusible product you are using. If you are using cotton batting or felt for this piece, just baste it along the edges to the back of one of the fabric pieces about 1/8 inch away from raw edge.

Fold the piece of ribbon in half with wrong sides together. Place it on the upper portion of one of the fabric pieces. The fold will be toward the bottom and the raw edges will be even with the raw edges of the fabric.

Place the remaining fabric piece on top of this. The right sides of the fabrics will be facing each other and the ribbon will be “sandwiched” between the two.

Beginning at the bottom edge, stitch around using a 1/4 inch seam allowance, leaving about 2 inches open in the bottom for turning.


Clip at corners and turn right side out. Gently push out corners and iron. Fold the edges to the inside where you left it open and press.

Stitch about 1/8 inch away from the edge all the way around the tab.


Find the center of the tab, closer to the bottom and use the pointed object that came with your snaps to make a hole. Place this on the toiletry bag and make a hole in that using this hole as a guide. Then make two more holes on each side of the center hole about one inch apart. Attach your snaps using the instructions for the snaps you are using. If you are using velcro (not my first choice) or large sew-in snaps instead, stitch them at those markings (do not make holes if using snaps or velcro).


Snap the tab to the bag and slip your hook or carabiner through the ribbon. You now have a hanging bag!

FOR THE FREE PDF PATTERN CLICK HERE


Sign up for Sher's Creative News so you don't miss anything!

There's a free machine embroidery design in every issue (unless I'm running a sale). You'll also find links to free sewing tutorials and articles too. The newsletter goes out once a week. 

Friday, April 4, 2025

Buc-ee's! Don't Miss this Little Gem While Traveling


Have you ever been on a road trip and passed a sign with the cute beaver that says Buc-ee's? Well, my advice is to stop in for a quick (or not so quick) visit. Buc-ee's is not just a fancy rest stop off the highway, it's an entire experience!

We travel a lot! Two of the places we regularly travel to are Texas and Florida, and there are a lot of Buc-ee's between here and there. My first time there, I was in constant aww! They have so many things that will make your road trip extra fun. They have a lot of choices for lunch, dinner, or a quick snack. Everything is super fresh and worth every penny. On our last visit we picked up some cobb salads for lunch and they were fresh as can be. We sat in the car and enjoyed them. No wilted lettuce in our salads!

They are really known for their smoked beef brisket. And the smell when you are in there is amazing! Not a fan of brisket or beef in general, don't worry, they have a lot more. Everything from sandwiches, salads, yogart parfaits, fruits, nuts of every kind, fudge, candies, cookies, chips, and so much more! My personal favorite is chocolate covered cashews. Yep, it's the only place I've seen them, and they are sooooooo good!

They also have some cute stuff too. They have holiday items, souvenirs, pets’ stuff, kitchenware, games, coolers, gifts, kids' stuff, and every kind of soft drink you could imagine. They are also known for their 100 plus gas pumps at each location. If your car is a little dirty, they have the longest car wash you've ever seen.

This may sound funny, but they are also known for their restrooms. Yep, I said it, "RESTROOMS." They are super clean and quite pretty. It seems like every time we travel, we see where another one has popped up. 

If you are on a road trip and see a Buc-ee's you should stop on by. I'm sharing the link to their website so you can take a sneak peek. Did I mention how much I love the place?

Oh, and my son would never forgive me if I didn't mention their beef jerky. They also have a little thing called "beaver nuggets." Yep, they have things you've never seen elsewhere. Be sure the check it out for yourself.

https://buc-ees.com/about/


Sign up for Sher's Creative News so you don't miss anything!

There's a free machine embroidery design in every issue (unless I'm running a sale). You'll also find links to free sewing tutorials and articles too. The newsletter goes out once a week. 

Monday, March 3, 2025

Shelf Ice - The Beauty and the Dangers


Unless you live along one of the beautiful Great Lakes, you probably aren't familiar with shelf ice. It is absolutely beautiful. My granddaughter had never seen it before so we took her over the weekend to see it. She was amazed at the difference it made along the shore. In the image above you'll see our lighthouse in the summer. Next to it you'll see our lighthouse in the winter. Quite a difference! If you are ever traveling along one of the Great Lakes, I think it would be worth a trip to the beach to see its incredible beauty. But NEVER walk on it or climb it! It's extremely dangerous. 

The shelf ice is formed when the waves crash to the shore in the freezing temperatures. Several weeks of this can create some pretty high ice. The danger is when you are walking on it. It looks thick, and it is, but not everything is completely frozen. You can be walking on a section that might look solid but under that ice can be (and many times is) a hole. Once you fall into a hole, you will never be able to come back up. The water under the ice is still moving and will take you with it. Can you imagine how cold that water would be? Yet every single year we see people walking on it.

I added some links at the end of this post that explains the danger in detail. So, if you ever get a chance to see it, definitely do and take your camera. Enjoy the beauty from a distance.

https://www.wndu.com/2025/01/22/hidden-dangers-shelf-ice/

https://www.youtube.com/results?search_query=shelf+ice+lake+michigan


Friday, July 19, 2024

Safety First - Always!


This post is a bit different than my usual crafting and sewing articles. I have what I feel is an important message because of our own personal experience this week. 

If you don't have a carbon monoxide detector, you need to buy one. If you can't remember when you last purchased one, buy a new one. We had a horrible storm this week that not only did a lot of damage, but left many of us without power for three days. 

Several years back we purchased a whole house generator. Second night in, we were awakened by our carbon monoxide detector. We immediately went outside and called 911. The fire department came with their meter and yes, the levels were high. They called our power company and came out and made several checks. It appeared that our generator gasses were seeping into the house via the dryer vent. We covered it up with duck tape, aired the house, then turned the generator back on. Next night, it happened again! This time we just turned off the generator and went to bed. Of course we aired out the house first. 

The important message here is that if we didn't have that carbon monoxide detector, we would have been in a closed up house for three days! More than likely I wouldn't be here to write this post had we stayed with toxic gasses for three days.

So order one if you don't have one. The one we have plugs right into an outlet so no attaching to a wall is needed. We have another one coming tomorrow. Since this one has done it's job, we are replacing it. They are also inexpensive. The one I just bought I ordered from Amazon for around $20.

Feel free to share this post, or share the experience with someone you know. They really do save lives!!!

Photo for attention. We took a road trip this past month and this is some of the beauty we enjoyed along the way.

Thursday, April 11, 2024

Tutorial - Fabric Tray, Great for Travel


We like to do a lot of traveling. We do two-week road trips and extra-long weekends. Some of our travels are to visit family while some, like road trips, we stay in hotels. I wanted a little tray that I could put on the dresser in a hotel or guest room that would hold my small items, so they don't get lost. When I travel alone to visit my daughter, I like to take nothing more than a backpack that fits under my airplane seat. I needed a tray that would take up no extra room. This is perfect because it packs flat. It would also be a great gift idea. Even dad would like it if you used fabrics with his favorite sports team or hobby!

If you want a downloadable PDF of this pattern, click HERE

Let's get started on this super speedy project!

You'll need the following: 

10 1/2 inch square of outer fabric

10 1/2 inch square of inner fabric

10 1/2 inch square of med weight fusible interfacing

10 1/2 inch square of fusible fleece interfacing 

*In place of the fusible fleece interfacing, you can use 100% cotton batting and either spray it to one of the fabric pieces with basting spray, or machine baste in place along the edges. 

4 sets of KamSnaps (or you can use sew-in snaps or velcro)

Thread and general sewing supplies

Instructions:

Fuse the fusible fleece interfacing to the back of one of the fabric pieces, and the medium weight fusible interfacing to the back of the other fabric piece. Be sure to follow the manufacturer's instructions for the interfacings you will be using.

On the backside of the fabric with the medium weight interfacing, draw a line 1/4 inch away from the edge on each side. Then take something rounded (I used a large thread spool) to round the corners. Since this is on the interfacing it will not show so you can use a pen or pencil for marking if you want. The red circles show where I rounded the corners.


Place fabric with right sides together and pin to secure. Stitch all the way around your edges, rounding the corners. Stitch on the lines and the curved corners you just drew. Leave a 2-inch opening in the center of one of the edges for turning. Trim at corners to relieve bulk. Turn right side out, gently pushing out the corners, and iron. Fold the excess fabric (at the opening) toward the inside even with the edges and iron. This opening will be closed with the next stitching.

Decide which side you want to be your inside. I'm choosing the travel themed fabric for mine. With this side facing up, stitch all the way around 1/8 away from the edges. This will also seal that opening closed that you used for turning right side out.

Take a ruler and measure 1 3/4 inches away from each edge. Mark with a disappearing marker or a chalk pencil like I am using since the markings can be brushed away. Stitch on that line, all the way from one edge to the other. Do this on each side.

TIP: I like to take a piece of painter’s tape and place it on the bed of my machine and keep the edge of the fabric even with the tape. Perfect stitching every time!

Take a ruler and draw a line from each intersection (where the seams cross each other) to the end of the rounded corner. This will be a 45-degree angle. Use your disappearing marker or chalk for this. Stitch on each of these lines.

You'll need four sets of snaps or some velcro for the final part. Apply them at each corner. The connecting side of the snaps or velcro should be against the inside of the basket. KamSnaps makes this so easy. You'll want your snaps close to the side seams and the outer edges. You'll use one set of snaps at each corner.

That's it! Snap the corners together and you have a little tray. Taking it traveling, just unsnap and it will stow flat in your travel bag.


Don't miss any sewing tutorials, helpful tips, or free embroidery designs! 

Sign up for Sher's Creative News

There's a free machine embroidery design in every issue (unless I'm running a sale). You'll also find links to free sewing tutorials and articles too. The newsletter goes out once a week. 

Saturday, July 15, 2023

Crossing the Canadian Border 2023

After a three month wait for our passports to arrive, my husband and I hit the road for a trip through eastern Canada. We covered locations which are completely different from each other. I'll share some of those experiences later.

There are some major differences between the US and Canada. Some took me by surprise while others made me question why the US doesn't enact them.

The biggest thing I noticed while traveling is how green Canada is. Wherever you see a trash can, you usually see recycling bins next to them. Every hotel we stayed at also had recycling bins next to our trash bins. Another thing I noticed was that there was not a single plastic straw to be found. All the straws we got for our drinks were paper or some other type of biodegradable material. They weren't the icky paper straws from years back that stuck to your lips, they were quite comfortable to drink from. I don't know if the straws in alcoholic beverages are the same because my husband and I gave up alcohol about a year ago, so we didn't use or see those.

Being a serious tea drinker (thanks to Mom’s English blood), I am very picky about my teas. I even carry a couple tea bags in my purse because I refuse to drink the generic icky stuff. Any hot tea I ordered either gave me a selection of teas to choose from or had a good quality brand with my hot water. As for the iced tea, many of the places we ate at only offered sweetened tea. I'm not a fan of sweetened tea so I just stuck to water for those places.

All the areas we traveled through (Eastern Canada) there was a lot of French. Just across the border in Toronto they had signs that had both English and French. It was the same for their TV stations. By the time we got to Quebec, it was all French! Fortunately, the people who live there spoke English and French, so we didn't have any problems getting around. However, all the road signs, menus, TV stations, etc, were all in French. The locals were very helpful though. I will also add that the kilometers were driving my husband nuts when he was driving. He wanted to go 100 mph and I told him that the sign said 100 km per hour, which is about 63 miles per hour. At least in the areas we were at, the speed limit was never over that amount.

That's the general breakdown of the entire trip. I hope you'll stick around for the next four posts where I'll get into the basics about the four general areas where we stayed.


Do you like free embroidery designs and tutorials?

Be sure to sign up for the weekly newsletter to get a free design every weekend (unless I'm running a sale). Sign up for Sher's Creative News


Saturday, June 17, 2023

Travel Journal & Sharing A Printable with You!


I'm a traveler. I love to travel. With my kids and parents at different locations in the US, I get the opportunity to travel often. When I get home I love to make travel journals, then convert them into PDF documents so I can read them whenever I want. I do this in my CorelDraw program but they can also be made in Microsoft Word, Samsung Notes, and so many other programs out there; many of which are free. While I'm traveling I like to remember everything so I upload journal pages into my note-taking app so I don't have to worry about forgetting anything. Once I get home, I combine my notes and some favorite photos in my travel journals.

My husband and I just came home from a two week trip through Canada. We covered four special locations in the eastern part. I'll be sharing some great information about them another time. 

I just added some free travel templates to my Nerdy Me page on my website. Feel free to snatch them up free of charge. I make them for myself so I like to share them with you as well.

If you are interested, you can find them at:

https://www.inthehoopbysher.com/nerdy-me.html

Enjoy!


Do you like free embroidery designs and tutorials?

Be sure to sign up for the weekly newsletter to get a free design every weekend (unless I'm running a sale). Sign up for Sher's Creative News

Wednesday, April 12, 2023

Are You Ready for the Three Dune Challenge?


The photo on this blog post is one I took while hiking the dunes. Long before the park became a National park (was just a state park) they didn't have the "3 Dune Challenge." They had the three big and steep dunes, but they didn't call it a challenge. We locals just thought of it as "Trail 8." And it's a tough one! When I first started hiking that trail, I thought I was going to die. I had this vision of DNR arriving to my aid on their 4-wheel vehicles. By the end of that sumer after going about two or three days a week, I had them mastered. I can even say that I never had to stop and rest, just breezed on through! 

The hubster and I were talking about getting our season pass and making it a regular activity once again. It has been about 15 years since I've climbed those dunes and I just know that I'll be back to near death again the first time. Between age and added weight, it will be rough but I'm bound and determined to make it happen. That is my goal for 2023.

If you want to see what I'm talking about, I've dropped a few links below so you can check it out.

https://www.youtube.com/watch?v=-XZK2mWxljI

https://www.hikingproject.com/trail/7013463/trail-8-3-dunes-challenge

https://www.indianadunes.com/explore-the-dunes/indiana-dunes-state-park/3-dune-challenge/

What will you challenge yourself to do?


Sunday, January 29, 2023

Sculptures

One of my serious obsessions is sculptures of all kinds. I especially love to see the ones where the artist is mentioned and information is displayed. Here is one that I saw while leaving San Antonio. The thing about this one that got me excited was the old suitcases. I'm probably going to age myself here but those are the suitcases our family used when traveling as a child. I can still smell the rubber in my mind. This must have been so much fun to make! And the memories of long ago trips are now flooding through my mind.

And for the record....

We had the suitcases in navy and beige. We even had the toiletry case and hat box case. Do they even make hat boxes anymore? At least I don't think so in the United States.


Friday, January 7, 2022

ALWAYS Trust Your Gut


I know you've heard it over and over again, but are you really listening to that little voice inside your head? Well, you should. If something doesn't feel right, then more than likely it isn't. This is for every life situation. It could save your life or prevent a disaster.

We and our dog traveled for ten days during the holidays. Our first leg of the drive started at our home near Lake Michigan heading to San Antonio to visit our daughter and son-in-law (and all the grand pets). The drive was quite nice with little traffic. We stayed over in Little Rock to break up the trip. The next "leg" we drove from San Antonio to the Tampa area to visit my dad and bonus mom. Again, breaking the trip into two days. Light traffic as well. 

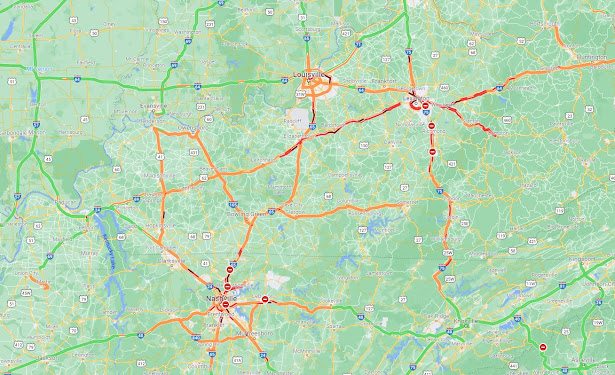
As we left Florida for our return trip home we stopped in Manchester Tennessee for that break. The only bad traffic was through Atlanta, but that seems to be the norm, though I've seen it worse. We arrived at our hotel around dinner time. We stopped and picked up some salads for the room. We got all checked in and sat down to eat our salads. I remember the lady behind the desk mentioned snow was on the way so I thought we should put on the news and see exactly how bad it was. Where we live snow is a winter-long occurrence and everyone is used to it. But here in the south, not so much. They have very little equipment to clear the roads. The weather lady started with the mention of a snowstorm that is definitely on its way in the morning hours and they will be watching it closely. I looked at my husband and said, "lets get out of here." He thought I was nuts since we had just checked into our non-refundable and pet-friendly hotel room. But he trusted my instincts because I had a strong feeling. So we loaded up the car and headed home immediately. We were tired from the drive there but I gotta say, even in the cities, we pretty much had the roads to ourselves. Zero to very little traffic.

When I woke up in the morning and looked at the Nashville area news they were calling it a CODE RED STORM. Telling everyone to stay off the roads. Had we stayed, we would have either been stuck on the highway, sliding all over, or possibly in a serious accident. I suppose we could have rented two more nights in the hotel but who wants to do that? I woke up this morning and the highways along our route was still in the red and orange.

Long story short, when your instincts kick in, LISTEN TO THEM!

Photo credit: Google maps on my computer screen. 

Wednesday, April 21, 2021

Renting Cabins - Check Every Corner of Your Room!

Now that the weather is getting nicer and the hubster and I almost fully vaccinated, it's about time to hit the road! Because of the events unfolding last year, we weren't able to travel at all. As I was looking through my travel journals (more on that another time) I was reminded of a recent trip to Tennessee to visit with family. The Gatlinburg area has always been a favorite of ours. We have family there and sometimes we take a bunch of other family members and rent a huge cabin in the mountains. Love the mountains! 

On one particular trip, we got quite a surprise when we were just getting into our room. We had just brought in our luggage and my dad and bonus mom stopped in to greet us, they were staying in the same RV park, but instead of a cabin, they had their RV. We're all sitting around chatting and I look down at the floor and I saw what appeared to be a toy snake behind a dresser. I bent down to pick it up and that's when I saw the tongue poking out. Nope, not a toy! The hubster and my father were looking for a broom to shoo it out while my bonus mom was laying on the bed with her feet up in the air screaming bloody murder. During this time I sent a picture of the snake to my then boss who is a veterinarian and an expert in reptiles and exotics. He assured me it was a simple rat snake that was not a threat at all to humans. Relief! 

The men did get the snake out of the room and even went as far as shooing it into the river. Seriously? Apparently, they weren't aware that rat snakes are quite good swimmers. Yep, it swam right back and went under our cabin. We called the park office and they sent someone out to capture the snake. They promised me that they were going to release it at the other end of the property and no harm would come to it. I mean, seriously, I think we traumatized the poor snake enough as it was.

So why am I sharing this particular story? Because the weather is getting nicer and you'll all be traveling and those that will be out in the wilderness, nature, the mountains, cabins, etc, need to check your space!

Saturday, August 20, 2016

Super Quick and Easy Luggage Tag Tutorial


Don’t you just love this bag? It’s a pattern from Two Pretty Poppets. It’s actually a beach tote but it fits my needs for a perfect weekender travel bag. Just one thing missing......a luggage tag!

These tags are seriously so quick and easy to throw together. To make your own, you can dig into your scrap pile because it really doesn’t take much. I used a fairly light weight plastic for the window but you can leave it open if you want, just be sure to make your information card larger than the opening. You can also skip the window and just make a plane pocket. I like the window because it’s a perfect fit for a business card. As for the plastic, it’s not expensive. I got mine from the remnant bin at JoAnn Fabrics.

To make your own you are going to need:

Fabric as follows:
(1) 2 x 12 inches for the strap
(2) 3 1/2 x 5 1/2 inches for the backing
(2) 3 1/2 x 5 inches for the pocket
(2) 3 1/2 x 5 1/2 inches for the flap

Interfacing as follows:
(2) 3 1/2 x 5 1/2 inches for flap and backing
(1) 3 1/2 x 5 inches for the pocket
(1) 2 x 12 inches for strap

You will also need:
(1) 3 1/2 x 5 inch piece of plastic (optional)
(1) KAM Snap set (size 20), or a sew-on snap (8 or 10 mm)
Thread to match fabric
General sewing supplies


Important notes:
**You will be using a 1/4 inch seam allowance for all stitching. Make sure that you do not go under that amount, in fact, it’s OK if you go just a smidge over.

**Fabrics can match, contrast, or you can use the same for all the pieces.

**Avoid touching the plastic with your iron. It could melt. Also, when pinning the pieces together, make sure not to poke the pins into any part of the plastic that will show (such as the window).

**Don’t make your stitches too small because you could actually perforate your plastic and it could tear during use.

**If pre-washing fabrics, do NOT use fabric softener. It can prevent you fusible adhesive from sticking.

Let’s begin:
1.  Fuse the interfacing to the backs of the corresponding fabrics. You will have a piece of interfacing for each of the four sets (backing, pocket, flap, and strap).

2.  With right sides together, pin the sets together. There will only be one fabric piece for the strap. Make sure all your edges line up evenly and round your corners. I used a quarter. Do not round the corners of the strap piece.


3.  Take the window pieces (3 1/2 x 5 inch piece), that are still right sides together, and lay them on your work surface with the interfacing side facing up. Draw a line 3/4 inch down from each edge. This will create your window.


NOTE: In my sample photo, you can see my pen lines extending past the corners, just don't stitch past the corners on those lines. Just stitch the square.

4.  Stitch on those lines pivoting at the corners. Remove from machine and draw diagonal lines from corner to corner creating an “X.” Cut on the lines. Clip as close to the corners as you can without snipping through your threads.


5.  Trim the excess inner fabric (that was once the X) down to 1/4 inch away from the seam.


6.  Turn this piece right side out by pushing one of the layers of fabric through the window just as if you were making a zipper opening in a garment. Be sure all the raw edges line up perfectly an iron well. Baste 1/8 inch away from the outer edges to hold. Be sure to use your large basting stitch because you will be removing some of the basting stitches later.


7.  Decide which side you want showing and place the window with this side up on top of your plastic. The raw edges of the fabric will line up with the edges of the plastic. Pin or clip to secure. Stitch plastic in place by stitching about 1/8 inch from edge of window opening. Be sure to stitch with the fabric on top of the plastic. Carefully trim away excess plastic about 1/8 inch away from the stitching line. I decided to cut the plastic much bigger than it needed to be to make lining up and stitching easier.


8.  Remove the basting stitches along one of the short edges and down about 3/4 inch on each side. Turn these raw edges to the inside 1/4 inch and iron. Stitch close to the folds to create the top edge of your pocket. Remember to be careful with the iron and the plastic.


9.  Place this piece on top of one of your backing fabric pieces (the one that has the interfacing fused to the back). Both of these will have their right side facing up. Line them up at the bottom edge. Now place the remaining backing fabric on top of these with the wrong side facing up. Pin or clip to secure.


10. Stitch around the edges. You will begin your stitching just at the beginning of the upper curve, and end your stitching at the same place on the other side. You want a nice opening at the top to turn right side out.


11. Clip curves and turn right side out. Turn the upper edge under 1/4 inch to the inside. Iron. Set aside.


12. Fold your strap piece in half lengthwise with wrong sides together. Fold the remaining two raw edges to meet at the center and fold back in half. You will now have a piece that measures 1/2 inch wide and 12 inches long. Stitch along each long edge close to folds.

13. Fold in half and slip the ends into the opening on the tag backing and pocket you just assembled. They should go in about 1/2 inch. Pin or clip to secure. Top stitch around the entire thing about 1/8 inch from edge.


14. With the right sides together, stitch around the flap pieces beginning and ending your stitching just like you did in step 10 when stitching your backing fabric and your pocket.

15. Clip curves, turn right side, out and iron. Top stitch around outer edges. 

16. Place this on top of your backing/window piece with the right top side of the flap facing up. Stitch near the upper edge about 1/4” down, and stopping and starting your stitching about 1/2 inch away from sides.


17. Attach the snap of your choice, insert business card or other ID, then hang from your travel bag.


Do you like free embroidery designs and tutorials?

Be sure to sign up for the weekly newsletter to get a free design every weekend (unless I'm running a sale). Sign up for Sher's Creative News

Related Posts Plugin for WordPress, Blogger...